The "Campaigns" section is designed for distributing traffic among various campaigns (offers) and configuring them.
In most cases, our technical specialist will create campaigns for you during the integration setup. However, you also have the option to do this yourself. To create a new campaign, click the "Add Campaign" button in the upper right corner. Fill in the following fields:
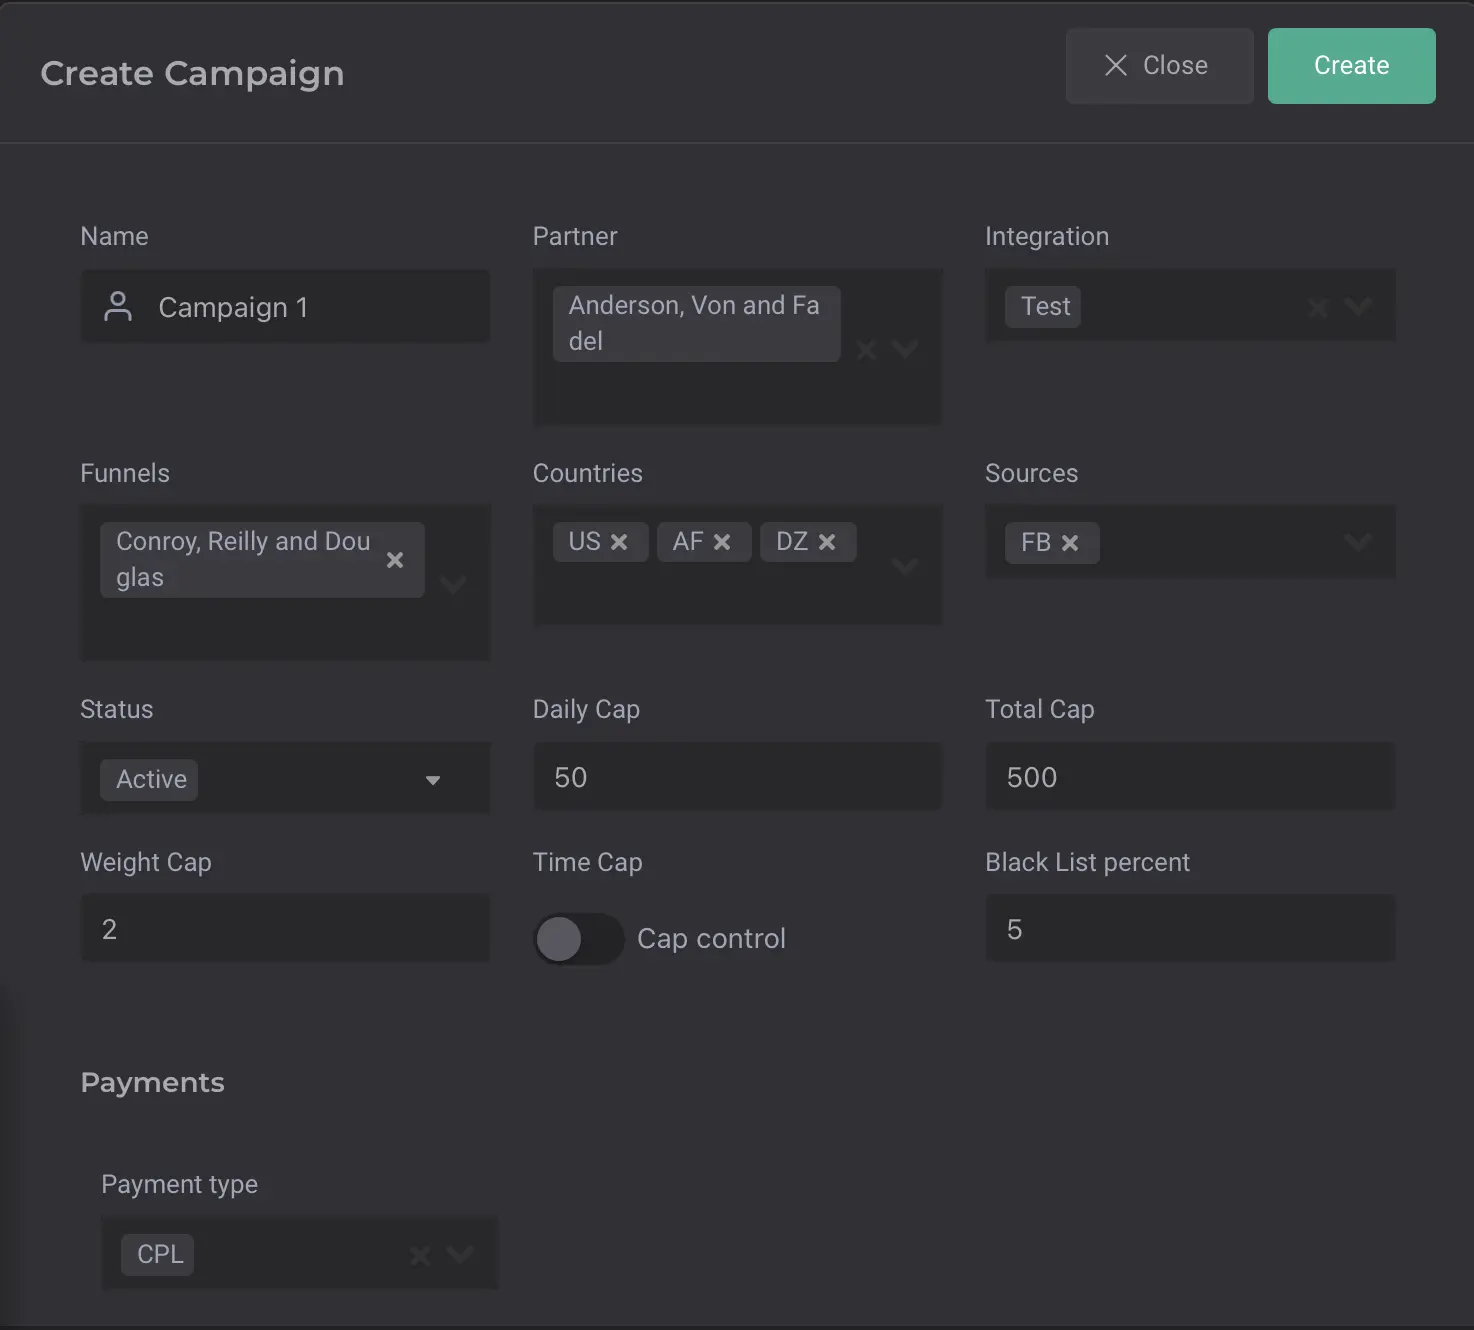
Name (Campaign Name): this can be the offer's name or a custom identifier you create.
Partner: select the advertiser (broker) associated with the campaign.
Integration: select the integration the campaign will use (our technical specialist will set up this integration for you).
Funnels: Select or add a funnel corresponding to the campaign.
Countries: specify the country in alpha-2 format (e.g., RU, KZ).
Sources: specify the traffic source.
Status: choose the campaign status. Active - the campaign is active, Pending - the campaign is paused, Rejected - the campaign is inactive.
Daily Cap (daily limit): the maximum number of leads the campaign can accept per day. Once this cap is reached, the campaign will pause until the next day.
Total Cap (total limit): the total number of leads the campaign can accept over the whole time.
Weight Cap (priority): if you want to prioritize the campaign, specify a value higher than 1. This is a multiplier that determines how many leads the campaign should receive compared to others. Example: A campaign with Weight Cap 2 will receive twice as many leads as a campaign with Weight Cap 1.
Time Cap (operating houres): allows you to set the time that the campaign is active. For instance, a campaign can accept leads only during specific hours from Monday to Friday. ⚠️ Note: CRMate works according to Kiev time, so take this into account when setting time limits.
Black List Percent: this is a setting that allows you to pay only for a part of leads, if they do not fully meet your conditions. For example, there are situations when not all leads from a certain region or with certain characteristics are processed and you are not always willing to pay for them in full. This setting helps to automatically calculate payments for a part of such leads. For example, if it is configured that only 50% of leads are paid, and you have 3 $50 leads, the system will pay only half of them - $75 ($150 / 2 = $75).
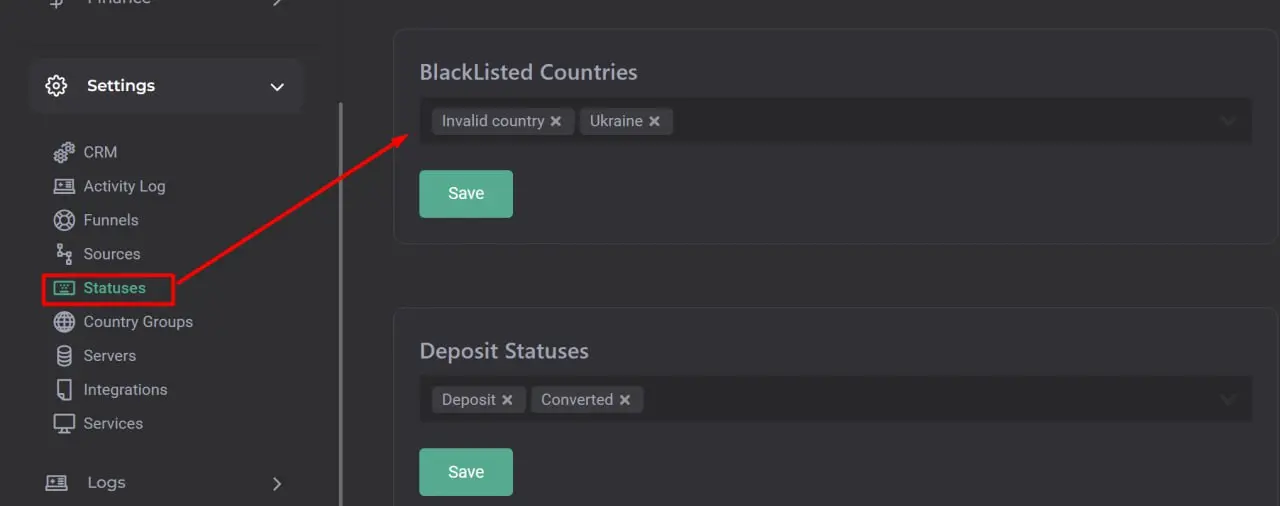
To use this feature, configure which lead statuses should be considered under this principle in the Statuses section.
Payments: configure payment models, such as CPA (Cost Per Action) or CPL (Cost Per Lead).
IMPORTANT! The name of the funnel (Funnels) must match the one specified in the lead exactly (e.g., Tesla_X and TeslaX). If the names do not match, leads will not be routed to the campaign.
If any required element (funnel, integration, broker, etc.) is missing from the lists, you can add it through the settings. See how to do this here. (гиперссылка).
The CRM system distributes leads across campaigns based on three key parameters:
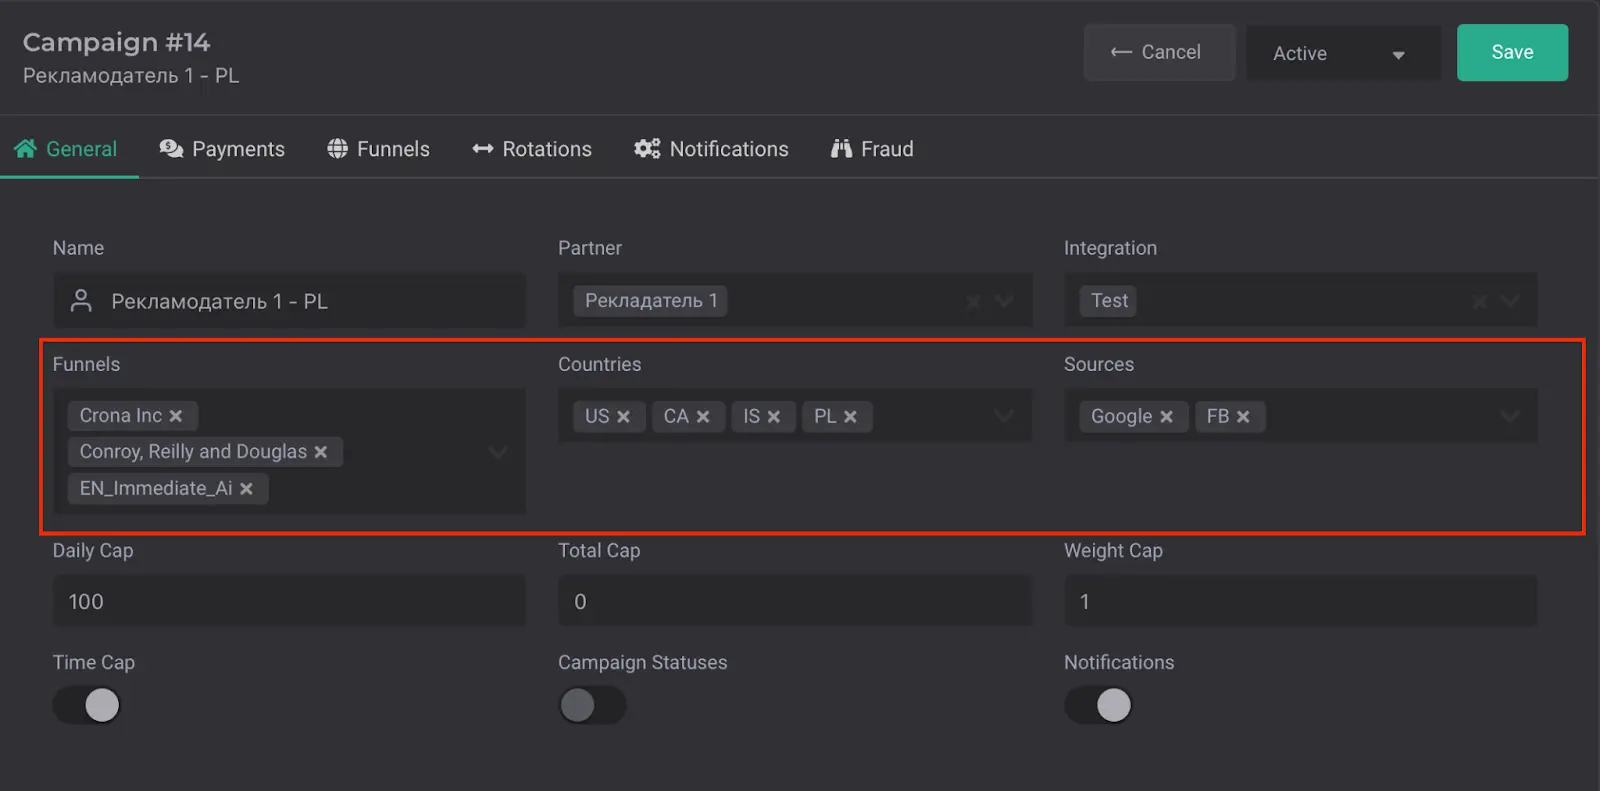
Funnels – the fuunel in the lead and the campaign must match exactly.
Country – specify the country in alpha-2 format.
Source – segmentation by traffic sources.
If several campaigns have the same settings for these parameters, the system will distribute leads between them one by one.
A campaign must be active, otherwise, leads will be directed to the "Hold" tab and will not be accepted by the broker (they will be rejected).
If you have several active campaigns running simultaneously with the same parameters in the settings (funnels, country and source),the system will fill them one by one.
There are the following campaign statuses:
To edit a campaign, follow these steps:
Now you have the full menu for editing the campaign.
In the General tab, you can change any data entered during campaign creation. This includes parameters such as name, partner, funnel, etc..
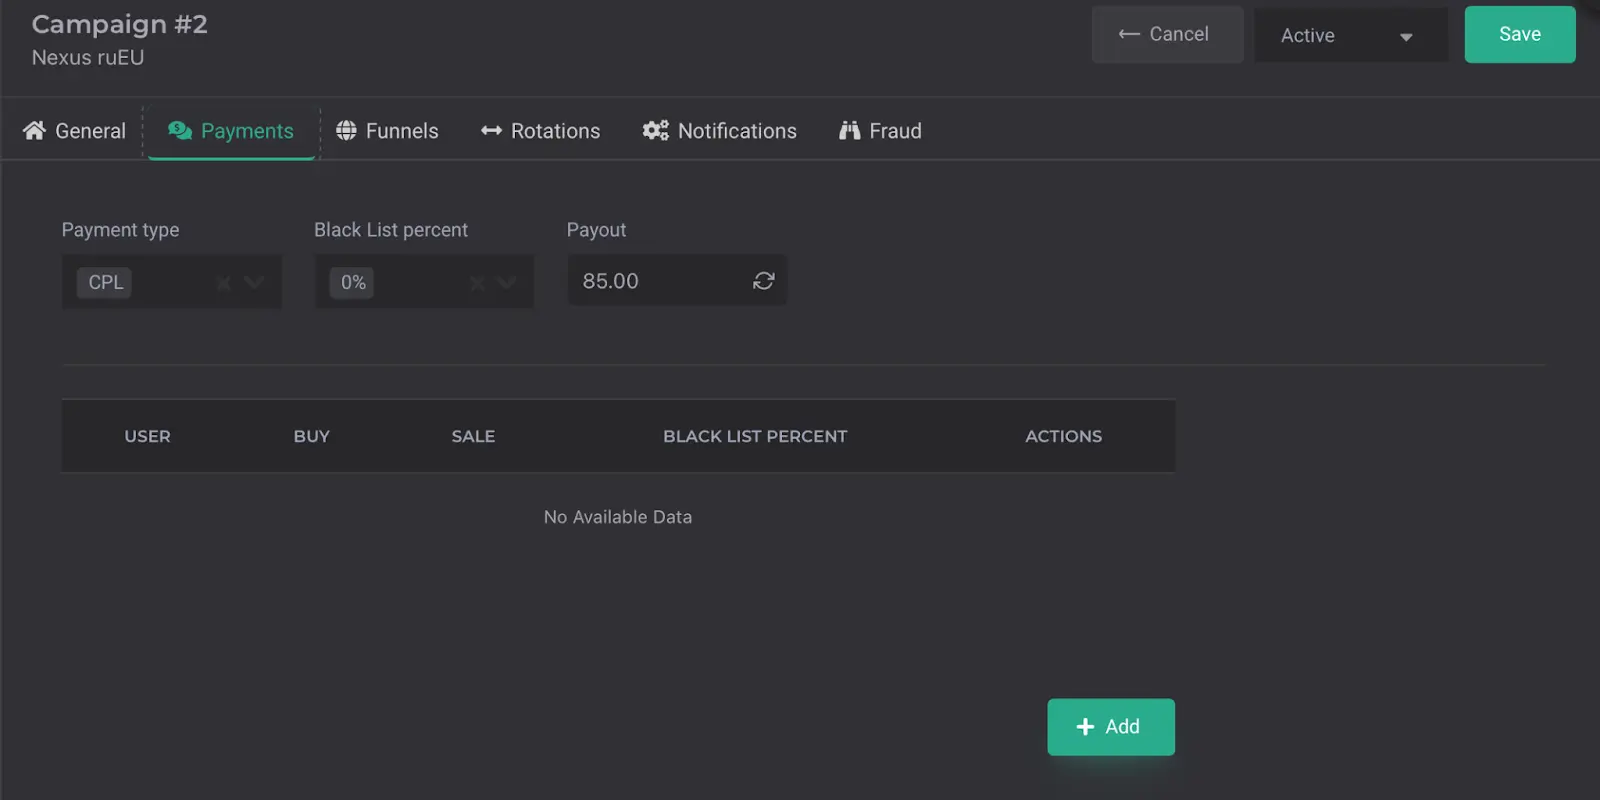
In the Payments section, you can configure payment parameters:
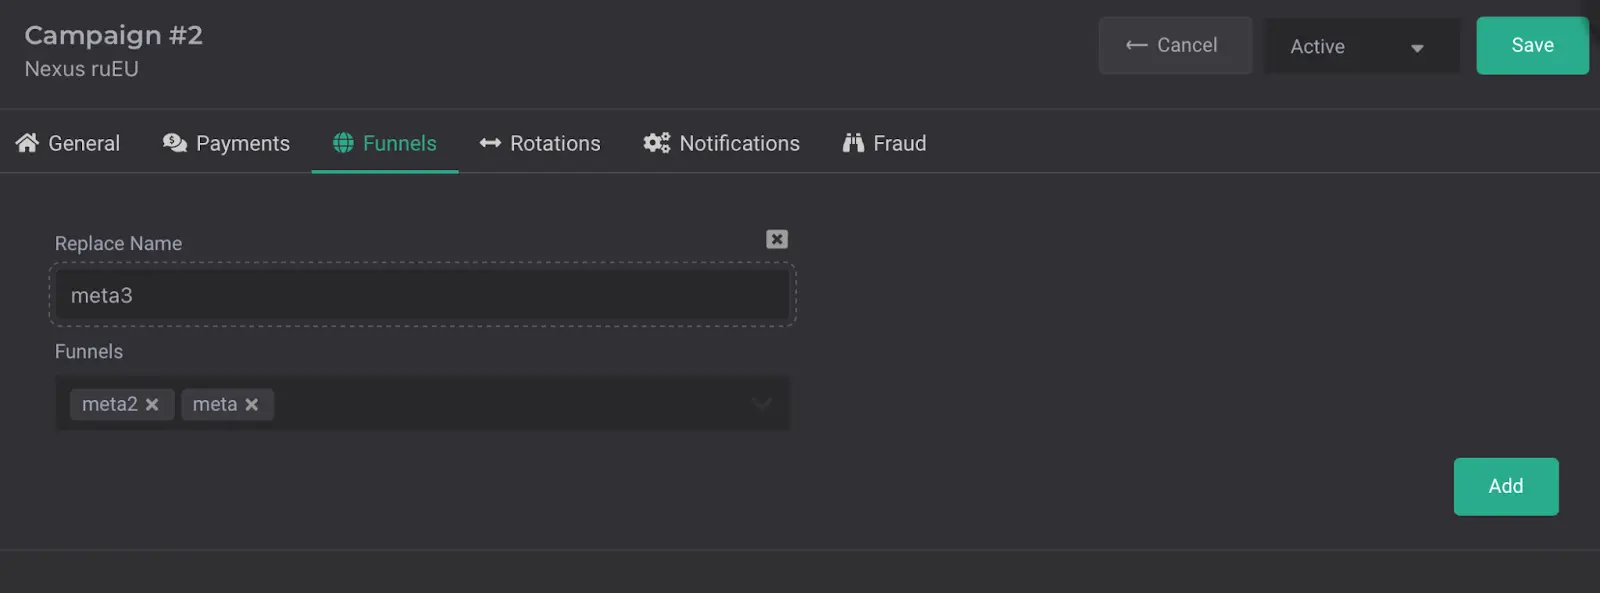
In the Funnels tab, you can manage and edit existing funnels.
For example:
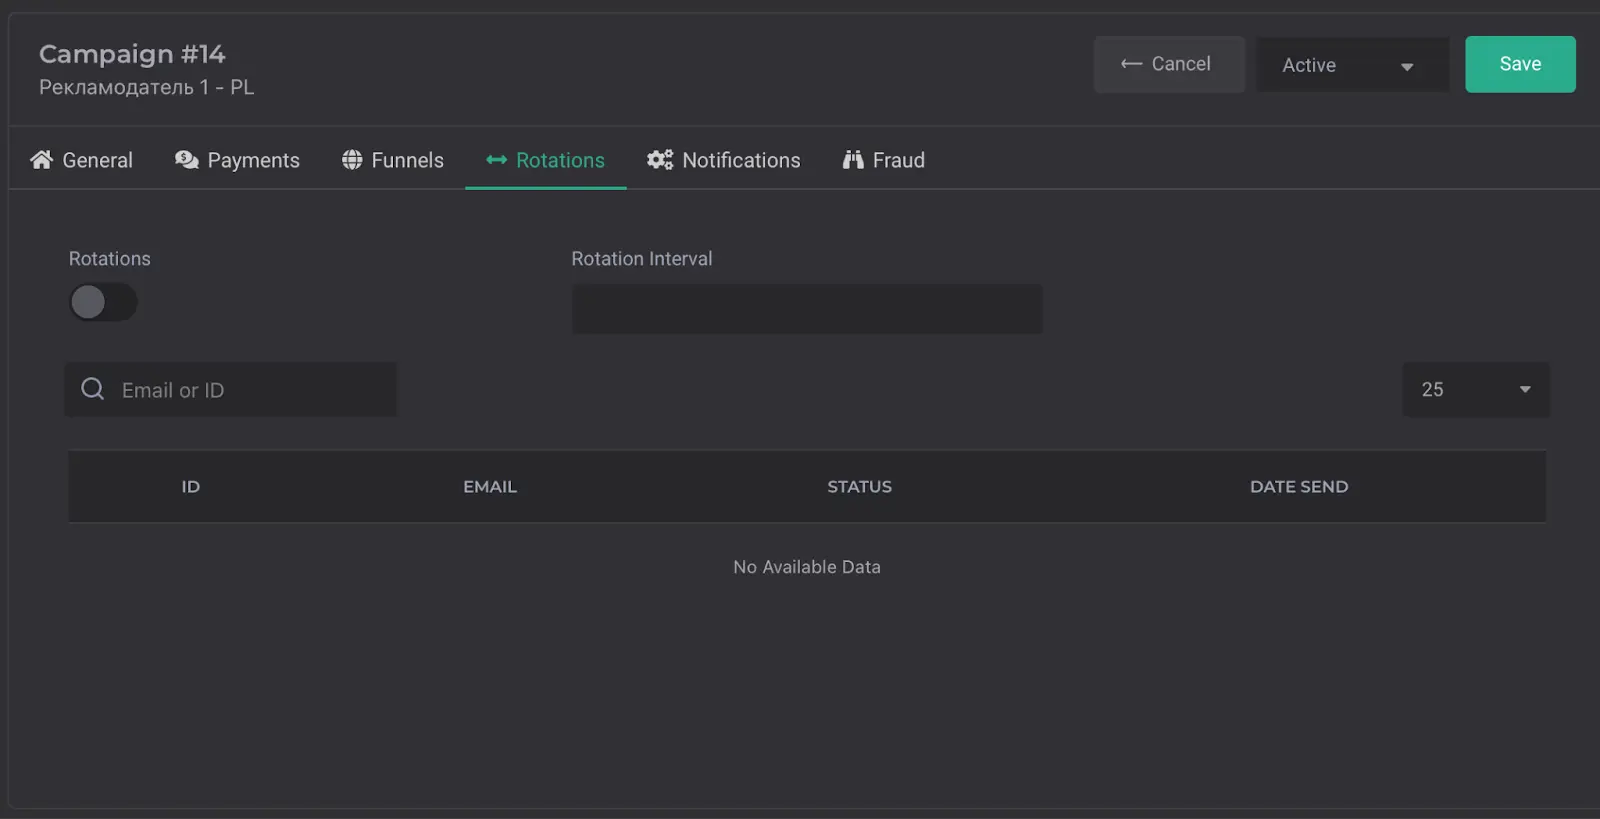
To activate rotation, follow these steps:
You can use the search by E-mail or ID, to find a specific participant in the rotation.
The table below will display the current rotation settings:
You can also select the number of leads displayed per page using the toggle — 25, 50 and so on.
In the Notifications tab, you can configure when and how to receive notifications about lead statuses and errors. Hovering the cursor over the Error Leads, field will open a menu with three options:

This section is for setting up additional fraud checks. When you hover over the selection field, a menu with three options will appear:

7. How the Anti-Fraud System works in the CRM
⚠️ Do not use the results of the additional fraud check in disputes, as fraudsters may learn how to bypass this protection. It is in your best interest to avoid this! ⚠️ For further instructions, please consult your manager.
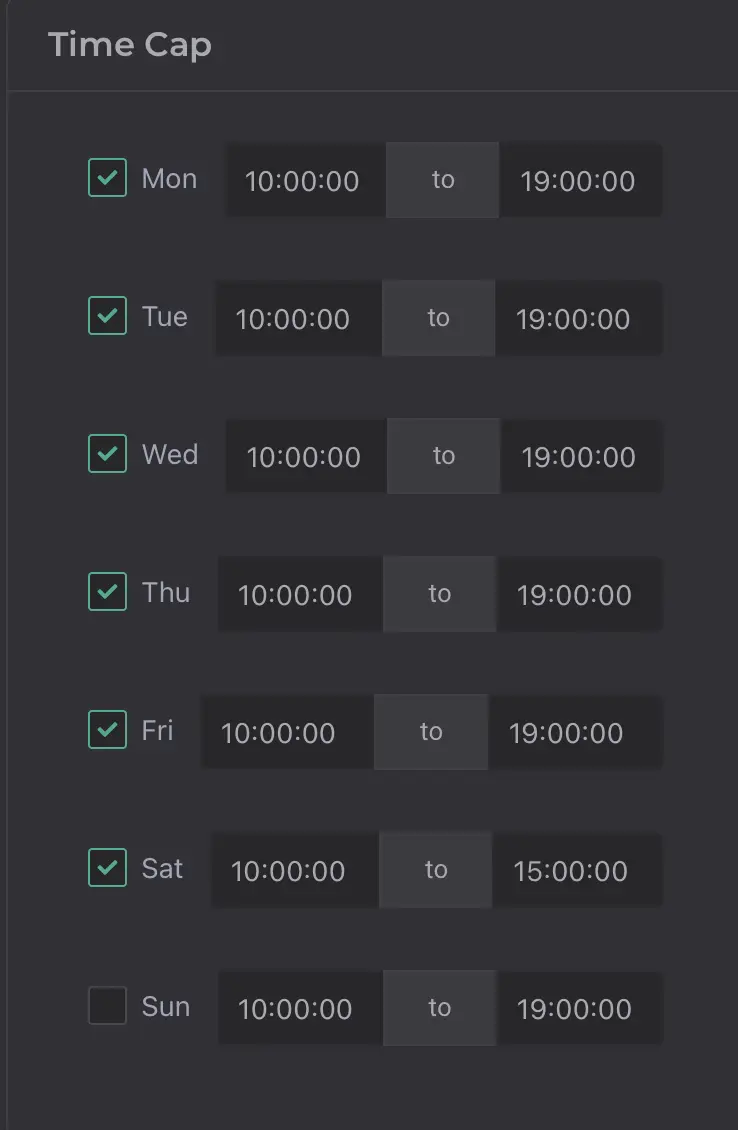
Time Cap Tab (Operating Hours) You can find this section in almost every tab. It defines the activation and deactivation times for each campaign. Enter the dates you want and check the marks (where there is a check mark - at that time the campaign will work). For example, in the screenshot below, you can see that the campaign is active every day from Monday to Saturday from 10:00 AM to 7:00 PM. On Sunday, the campaign is disabled.
In CRMate, everything operates via API, so if a webmaster wants to send traffic to you, they need to set up the integration themselves. You just need to provide the necessary data and prepare a bit.
Step 1: Register the Webmaster
1 .Request the webmaster's email or create one yourself (the email is only needed for login).
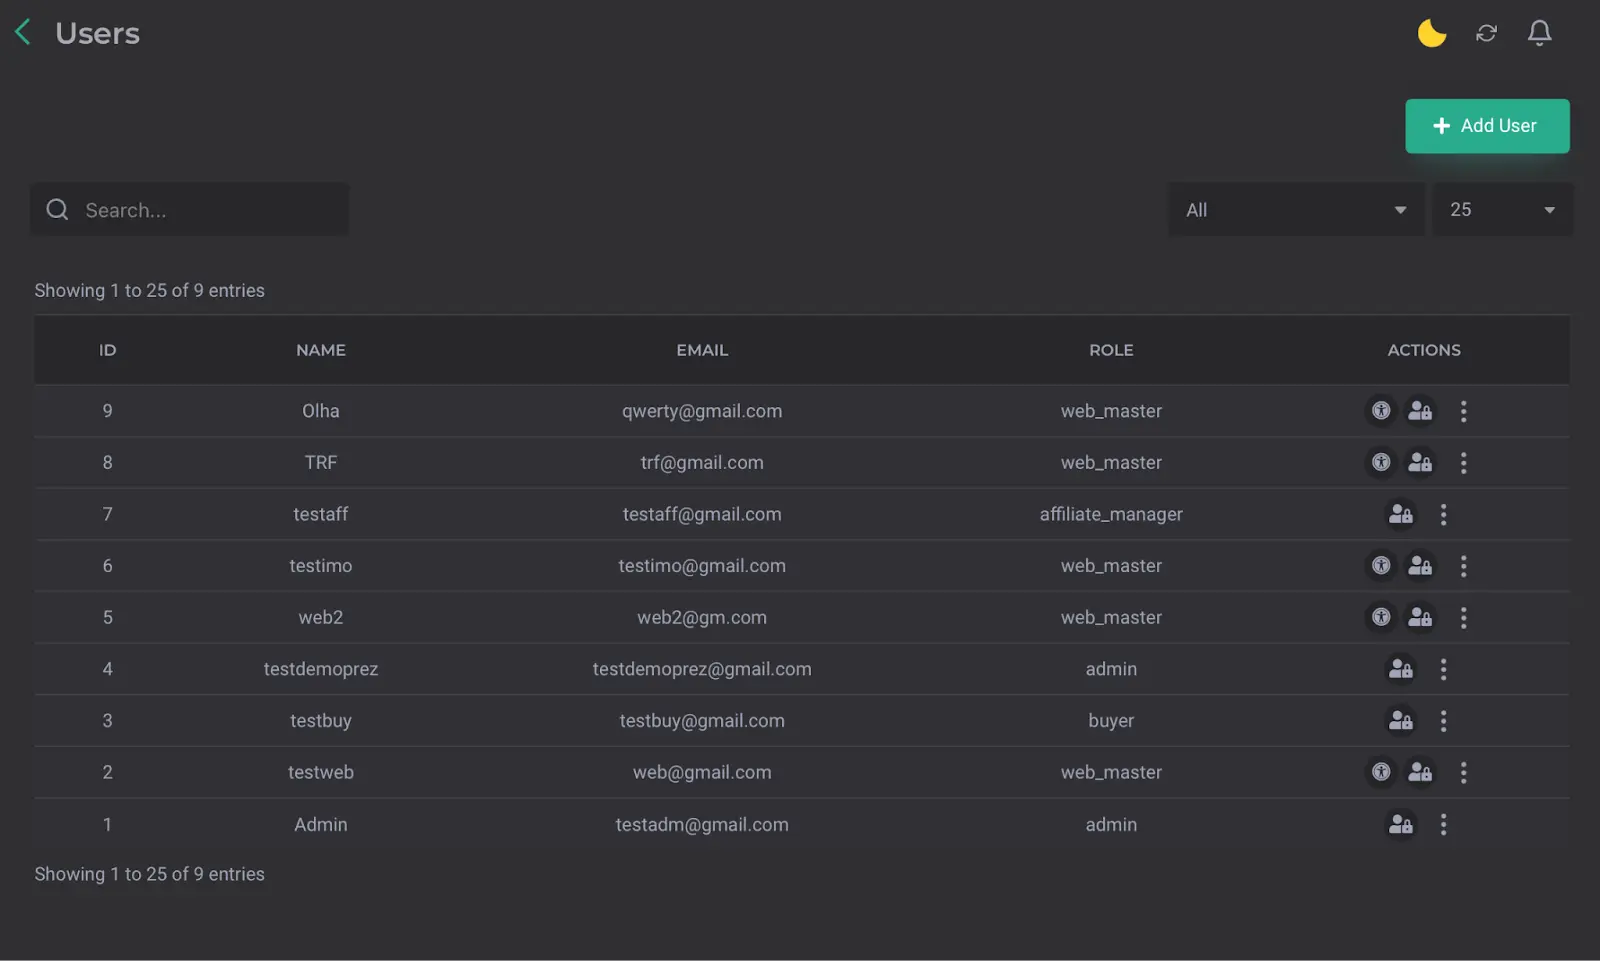
2. Open the Users section:
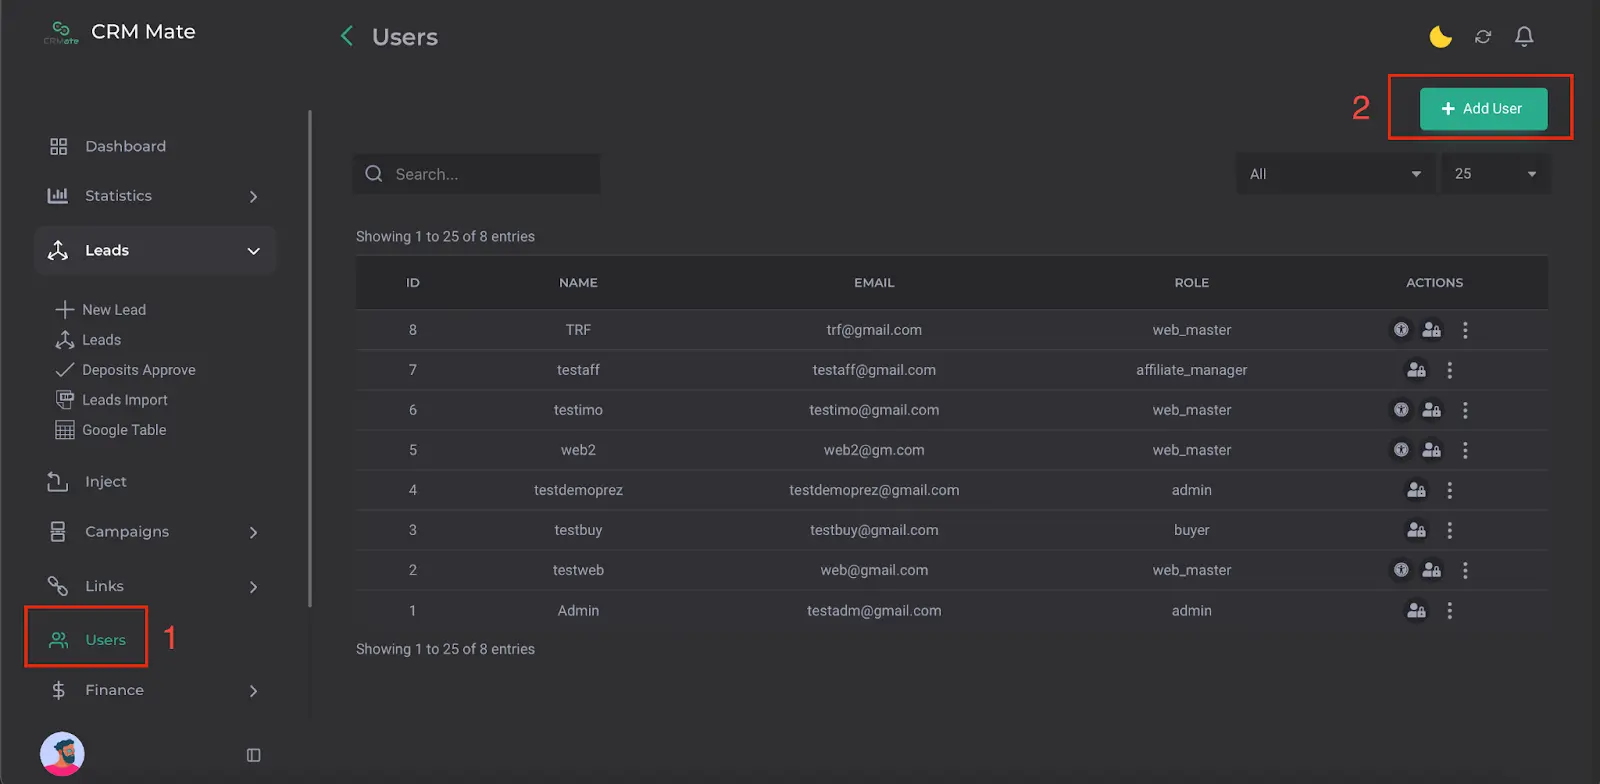
3. Click the Add User button and create a new user with the role of web_master.
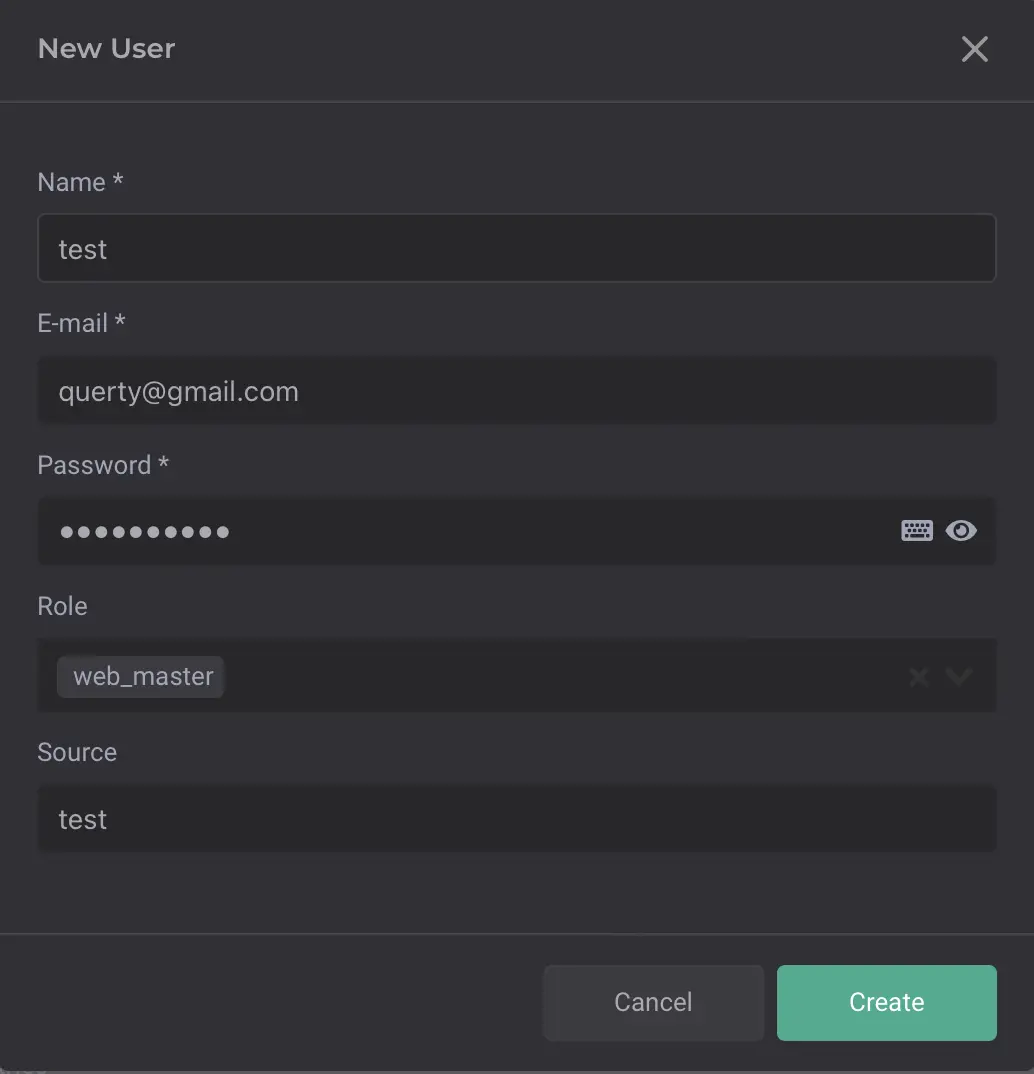
Step 2: Providing data to the Webmaster
You need to provide the webmaster with the following data:
Here’s an example of the list you’ll provide:
You’ll send this information to the webmaster with the following message:
Integration
Sending Leads:
Lead Export
 curl --location --request GET
'https://crm.yourdomain.net/api/web-master/leads' \
 --header 'Authorization: Bearer TOKEN' \
 --header 'Content-Type:application/json' \
 --data-raw '{
 'date_start' : '2022-05-05',
 'date_end' : '2022-05-05'
 }
It is important to specify the funnel names exactly as they are written in the chat, as these will be passed in the "landing_name" field. These exact names are used to open the offer for you.
❗️❗️❗️Important Note❗️❗️❗️ If you change the funnel name in the "landing_name" field, please notify us about this in the chat. Otherwise, your leads may be automatically rejected!
This will allow us to quickly adjust the process and prevent unnecessary errors.
Opening an offer for receiving a test lead.
To open the offer for receiving a test lead, you need to clarify with the webmaster how the funnel will be named when passed in the "landing_name" parameter. Once you get this name, go to the Funnels tab and add the funnel to the list.
This way, we can properly configure the offer and ensure the correct processing of the test lead.
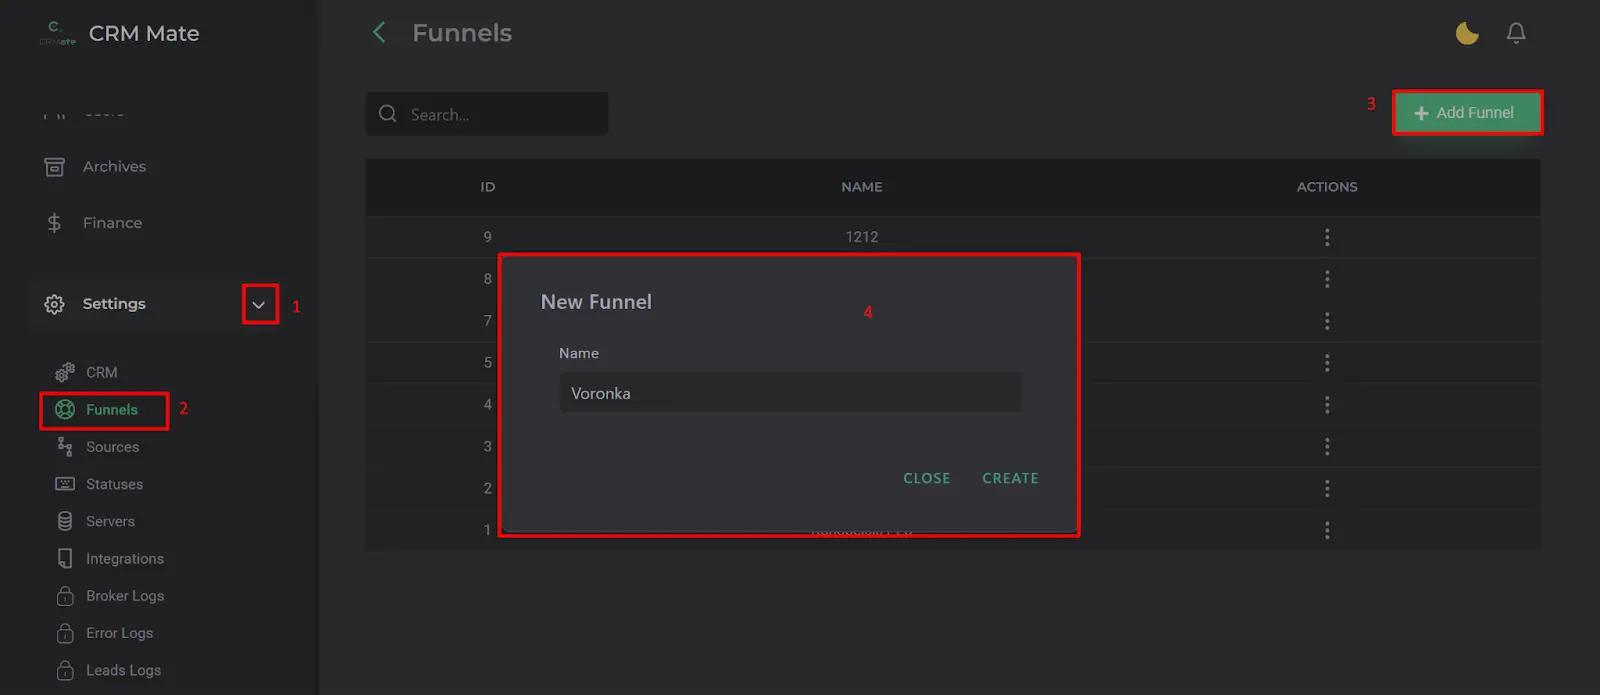
Another way to add a funnel to the list is by conducting a test with the required funnel. Any funnel that enters the CRMate system will automatically appear in this list.
However, in this case, the webmaster will need to perform two tests: the first test is to ensure the funnel appears, so you can add it to the campaign (at this stage, the lead will show as “rejected”),the second test will happen after you've set up the offer on your side.
Once these tests are complete, proceed to the campaign settings to finalize the process and prepare for full-scale operation.
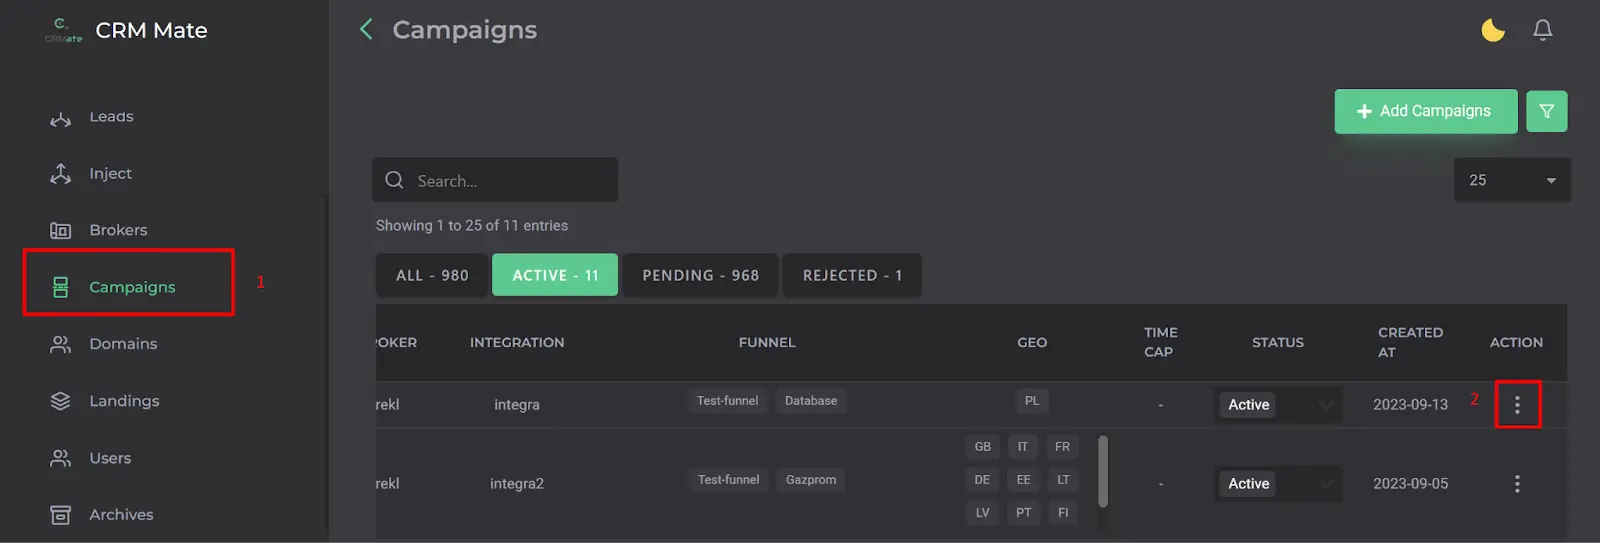
Let’s assume you want the webmaster ArbitragnilkTEST to send you leads from Kazakhstan (KZ) using the funnel Voronka. In this case, the campaign settings should look as follows:
Once you have set up these parameters, the system will be able to correctly distribute leads and send them to the appropriate offer.
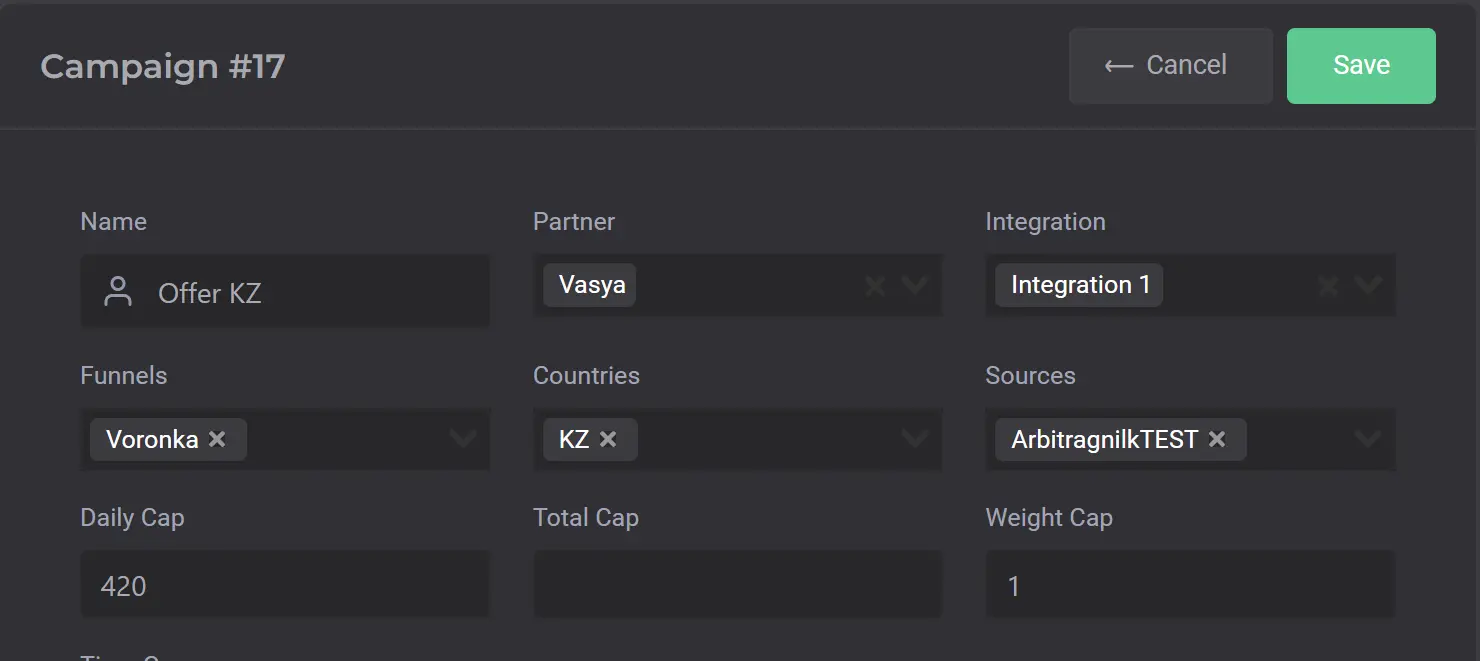
If everything is set up correctly, leads will start coming to the correct offer without any issues. The system will automatically allocate them based on the specified parameters, and you will be able to track results in real-time.
УMake sure all campaign settings meet the requirements to avoid potential errors in the future.

If a lead is not associated with an offer (as in the example above with the second lead),it will be marked as "rejected". In this case, do not send it manually to your offers without notifying the webmaster, as their system might have automatically forwarded the lead to another advertiser.
If the webmaster asks you to update the status and mark an FTD on the test lead, you can do so through the lead settings in two ways:
In the pop-up window, click the Edit button to update the necessary data.
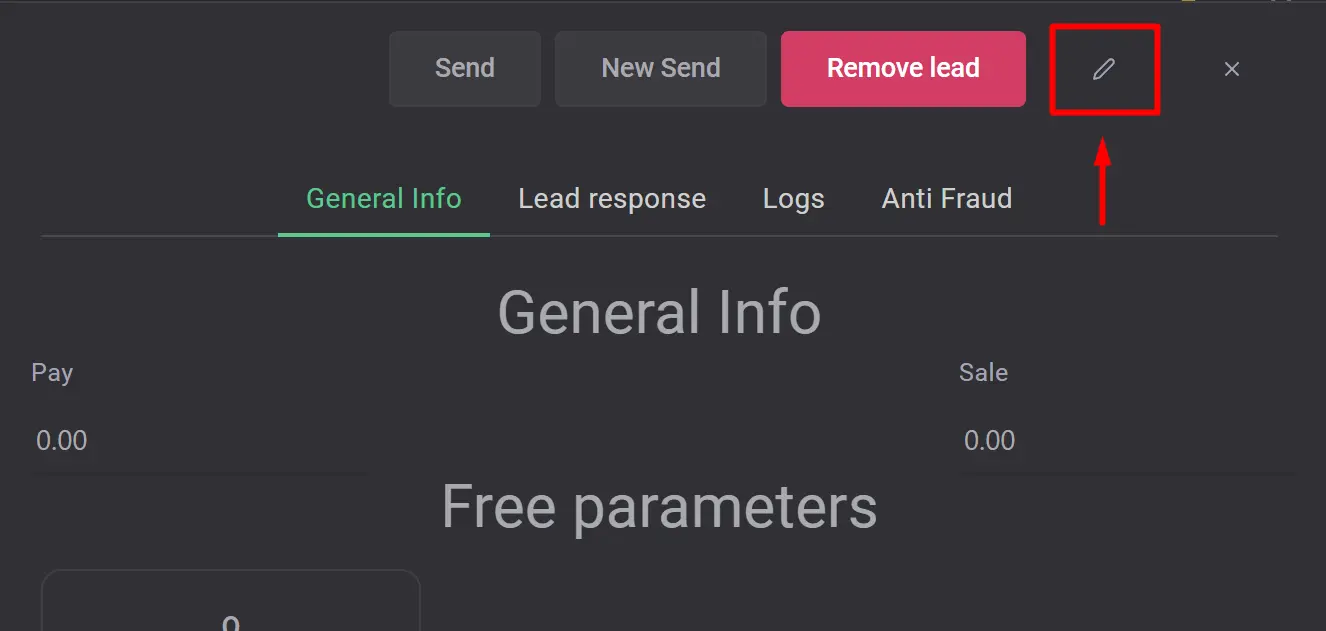
After that, change the status and check the Conversion mark.
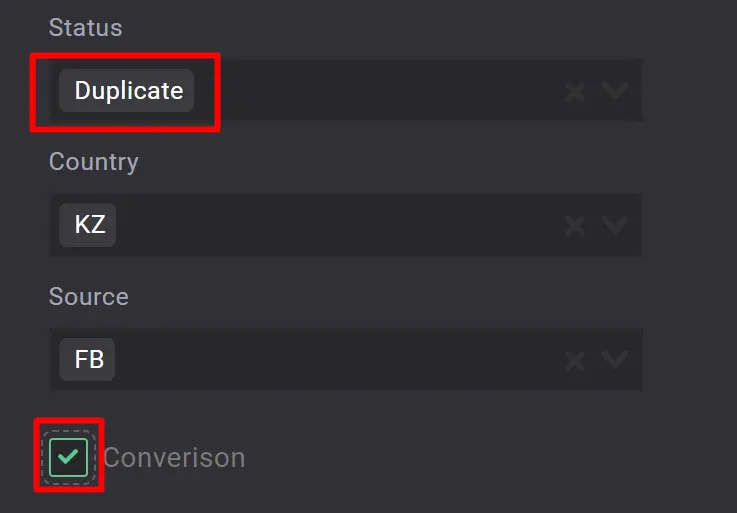
And don't forget to save. The integration is complete.
Dashboard — is the "face" of your CRM. In this section, you can quickly assess the current status for the month, compare metrics with the previous month, and get an overall view of how things are progressing. It provides a summary of all key metrics, helping you make quick and informed decisions based on up-to-date data.

If desired, the Dashboard can be customized to suit your goals using filters:
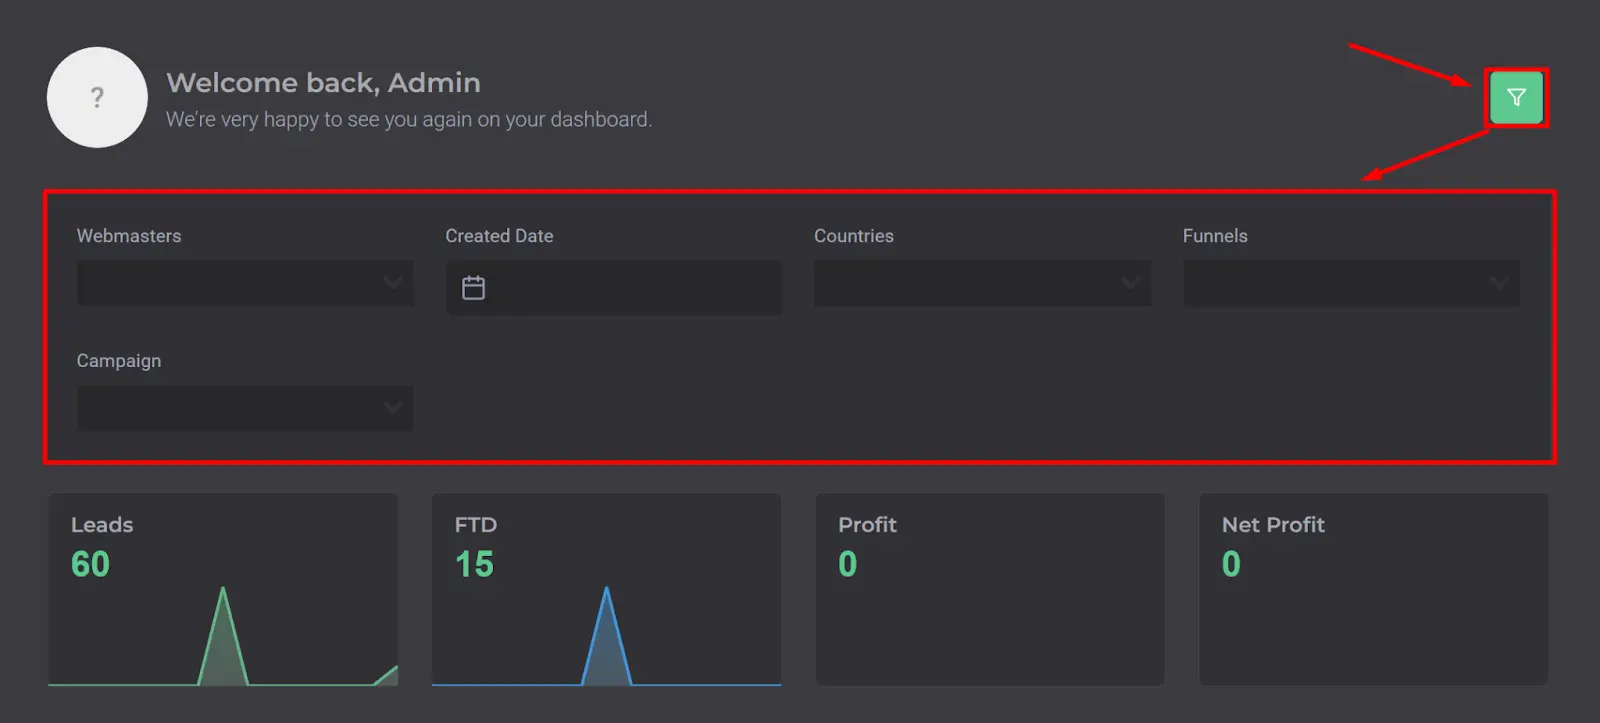
In the Caps section, you can track the caps' limits for the current day. Active offers are displayed first, allowing you to quickly assess their status and monitor which ones have already reached their limits. This helps you effectively allocate traffic and ensure that the set limits are not exceeded.

Statistics — is a key section for analyzing your traffic. It provides three main blocks of statistics:
This section helps you thoroughly analyze and optimize results for every parameter..
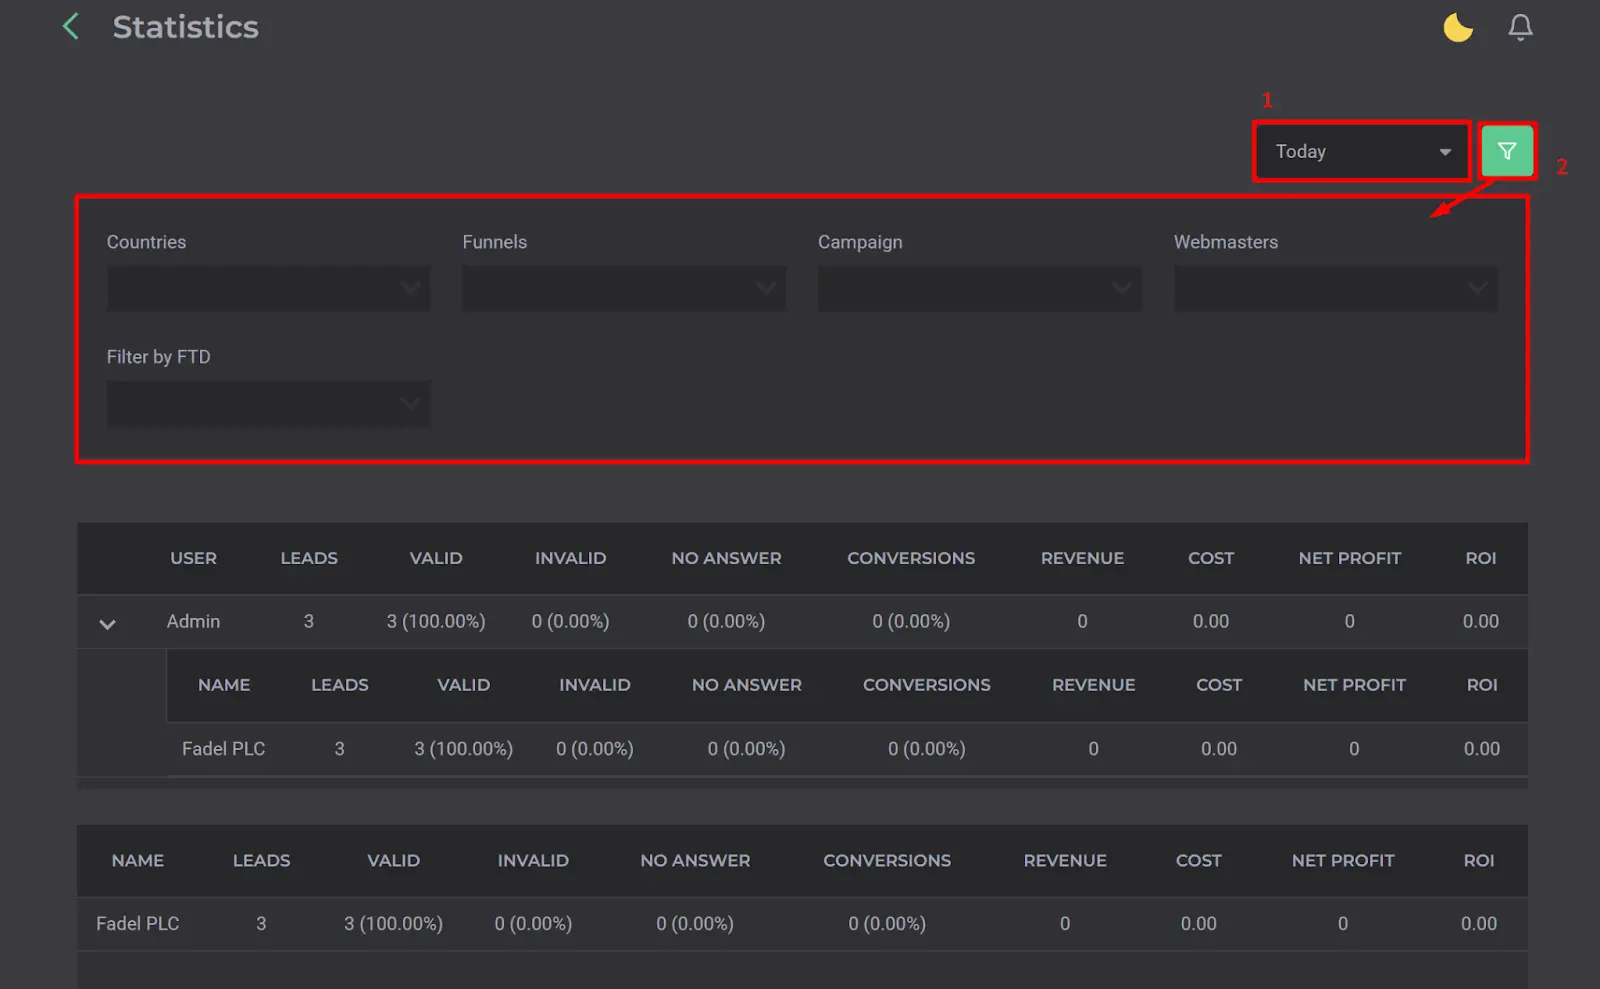
1. Define a specific time period for your analysis.
2. Filters
The table below:
Leads — section is the core of the CRM system, where most of your time will be spent managing and analyzing lead data.
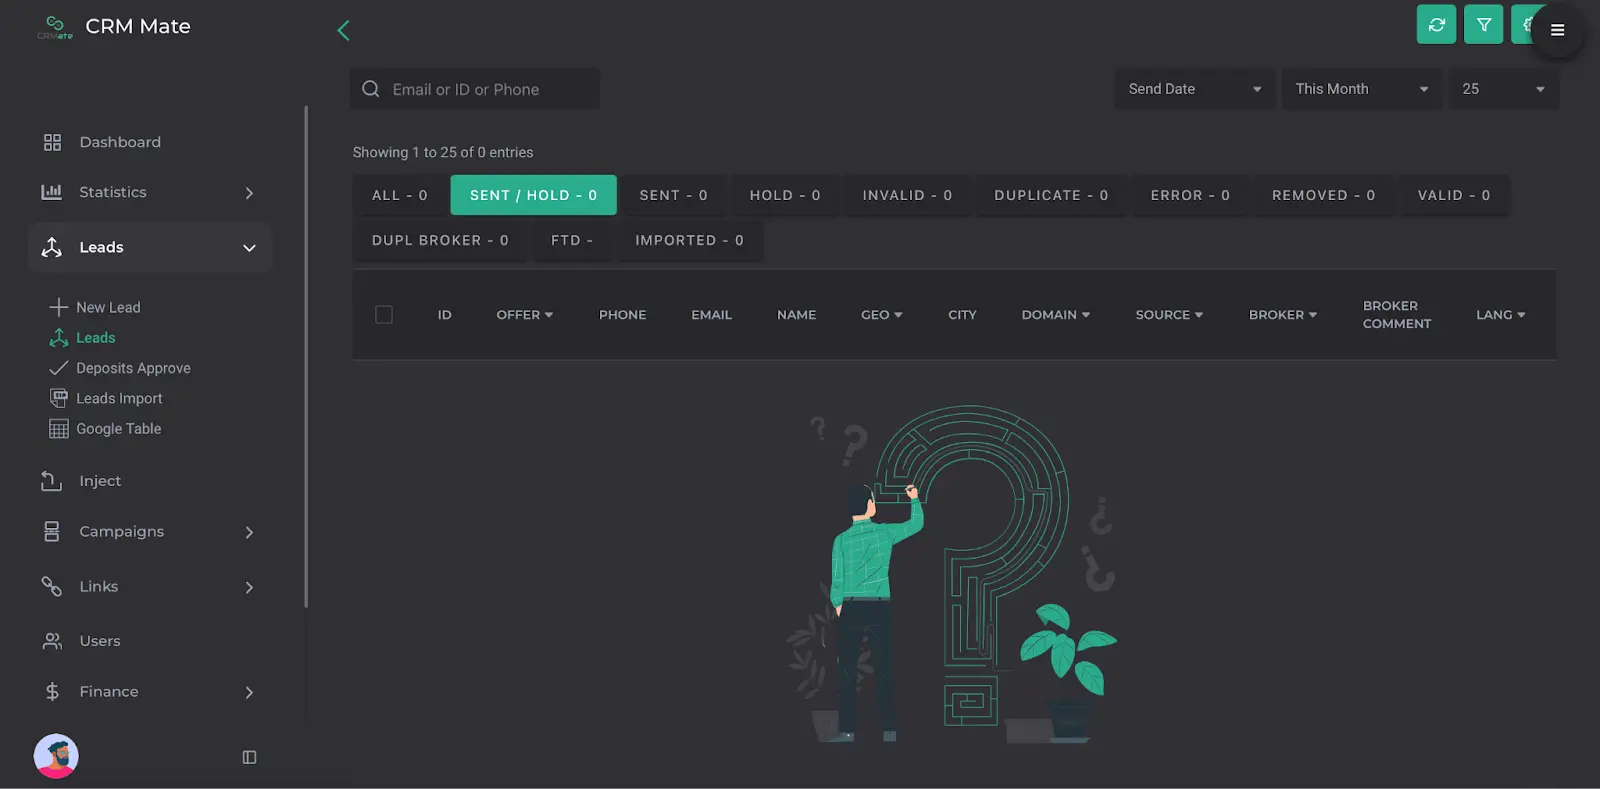
It is important to customize the display of all the data you need once. After customization, the interface will display exactly the information you need to work effectively with leads, which will make the management process more convenient and faster.

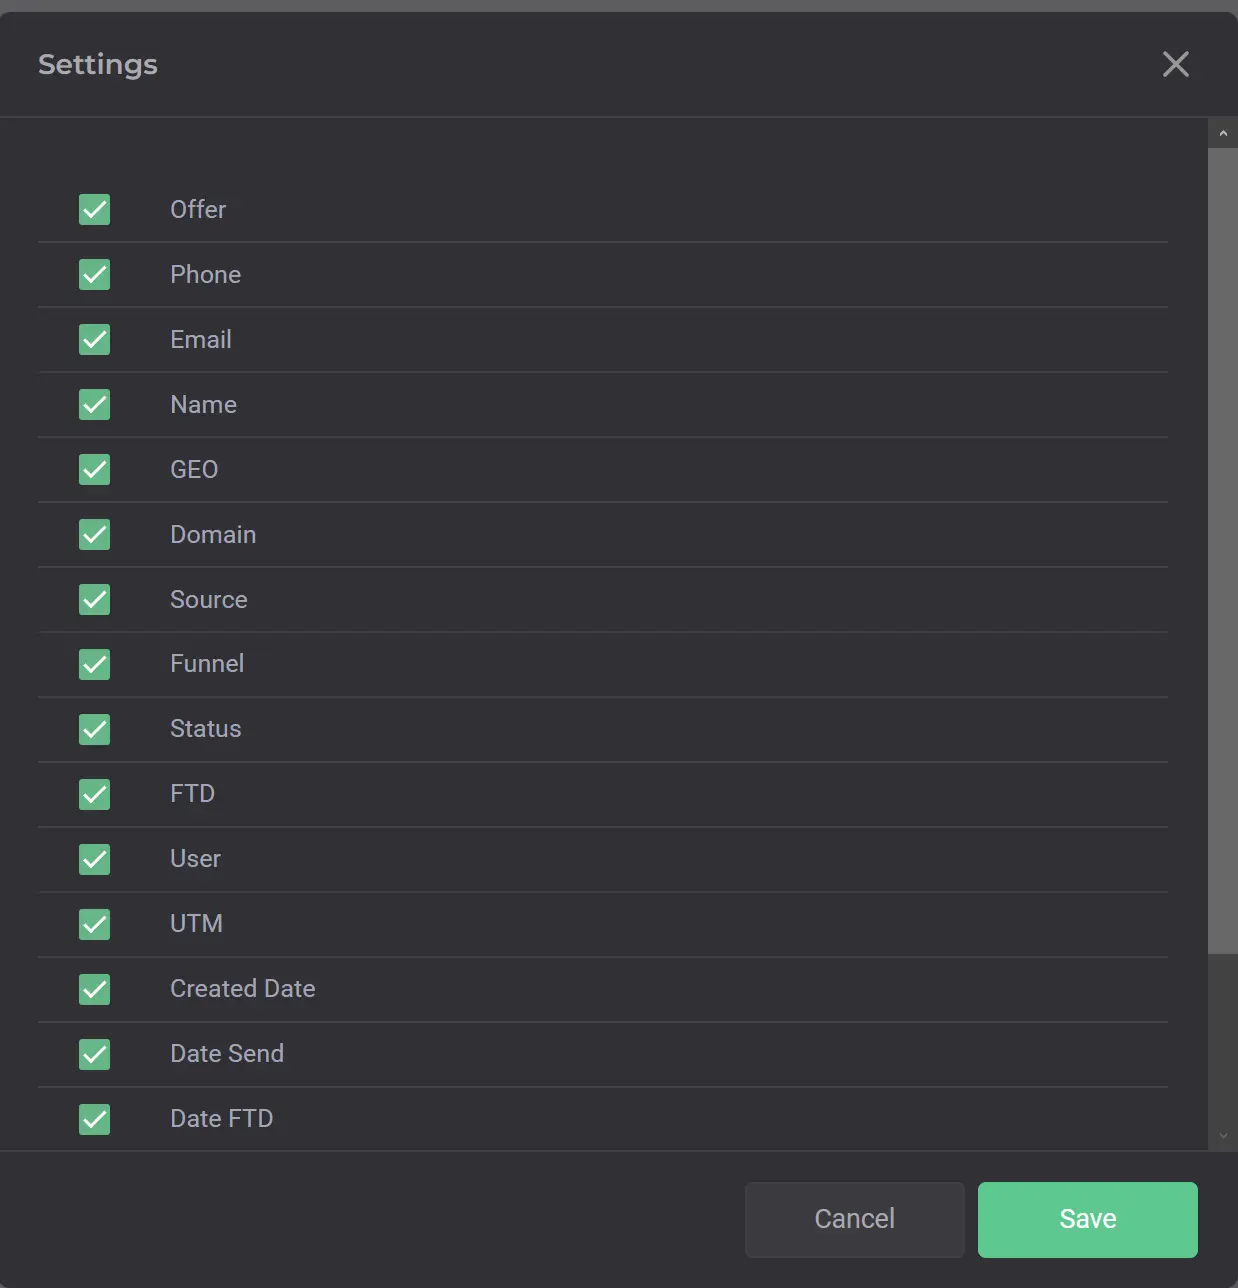
In the window that appears, select the necessary columns to display the data. If you are not sure what you need, it is recommended to select all available options - nothing unnecessary has been added to our CRM. Once you have made your selection click Save to save your settings. This will give you easy access to all important lead information.
Next, let's break down the other buttons:

The Leads section in your CRM provides specialized filters to refine your data and gather specific statistics. Here's a breakdown of the key categories:
These features and sections make working with leads in your CRM more convenient and efficient, allowing you to quickly find and manage the right information.
To perform any actions on leads, you must first open a specific lead. To do this:
This menu will give you access to all the data of the lead and options to edit or resubmit it.
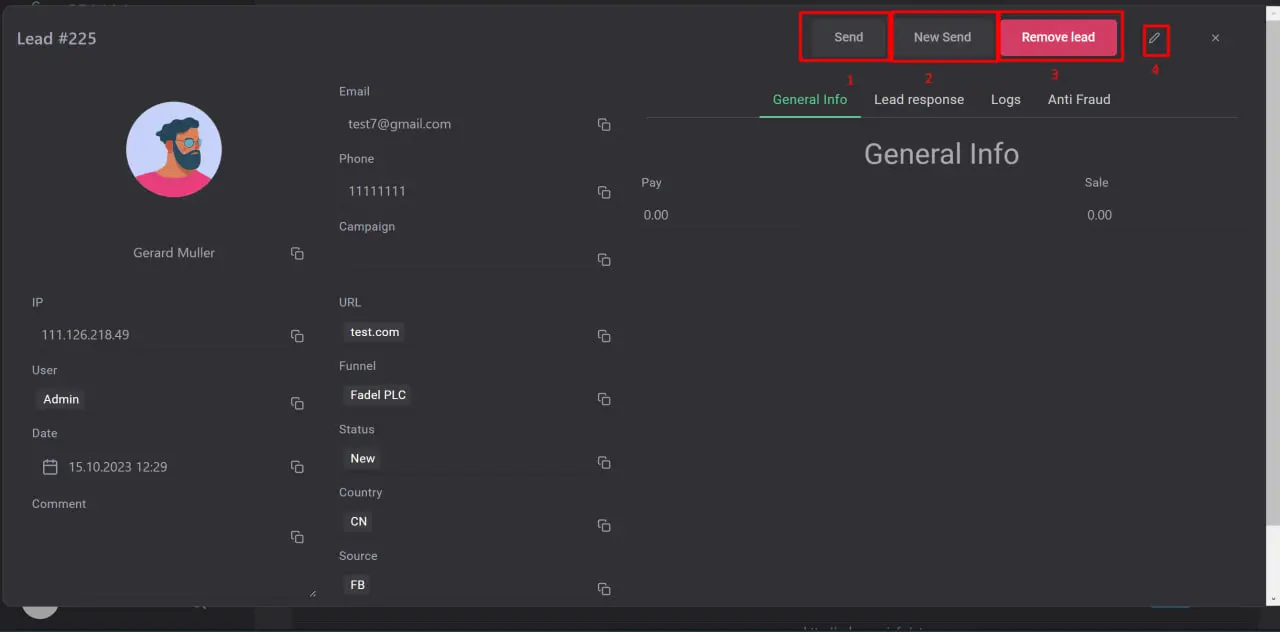
These features will help you manage leads efficiently and keep your CRM organized.
If the lead has not been resent for any reason, you should review the CRM Mate Documentation. section.
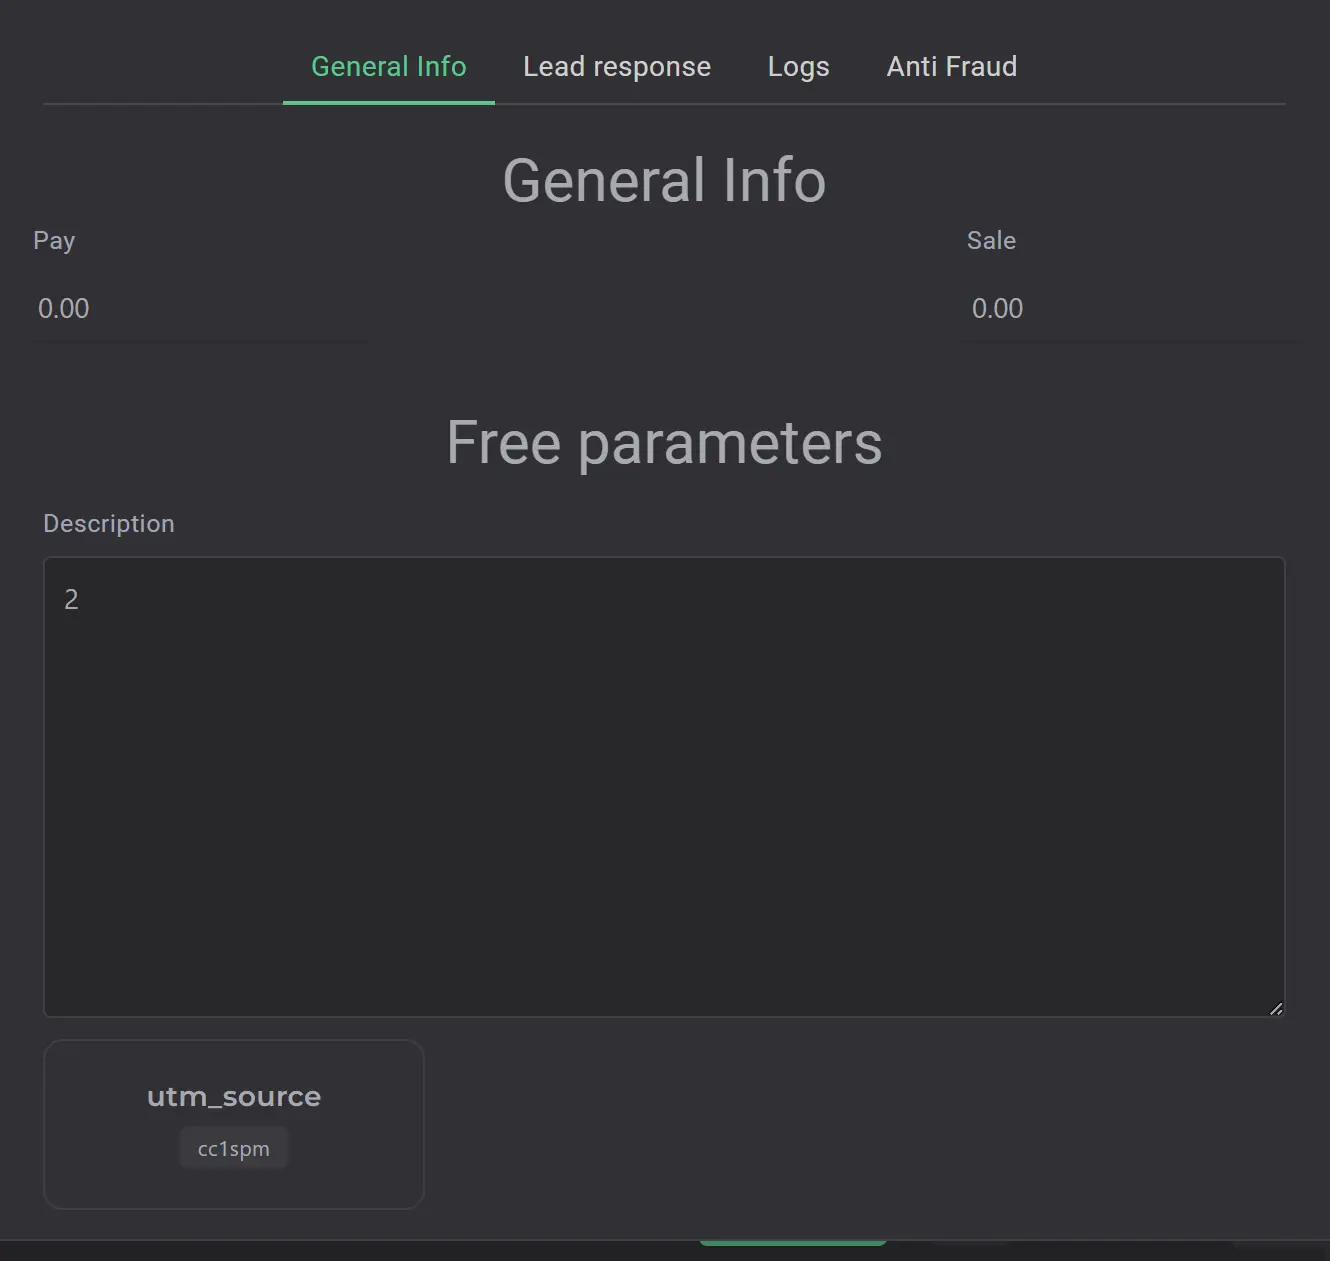
In the General info section, you’ll find key parameters that provide insights into campaign performance and lead quality. Here's a breakdown of what each parameter represents:
Free parameters consist of two parts:

Lead response stores information about the responses from your advertisers. If you don't understand why a lead was not accepted, just copy the response from this section and send it to the advertiser in the chat. This will help you to quickly find out the reason and set up the process.
This feature allows you to keep in touch with your advertisers and promptly respond to any problems with leads.

Logs - changes in the status of the lead.
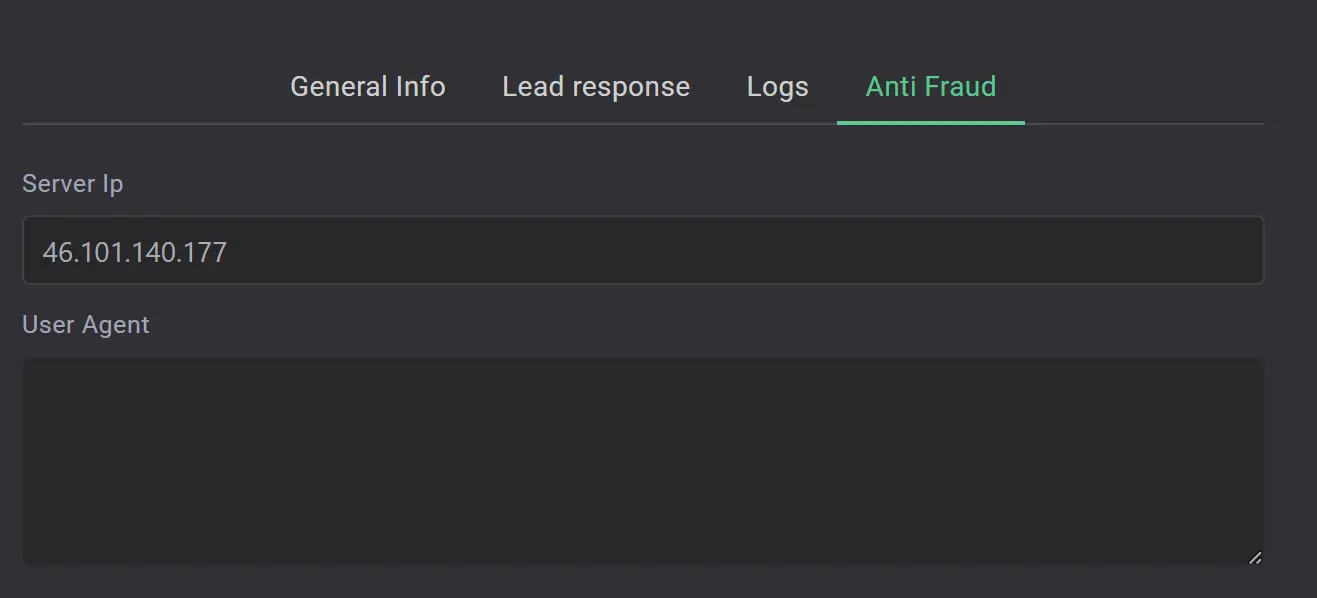
The Anti Fraud section displays information about the server from which the lead was sent, if possible. It is important to understand that this is not the IP address or user-agent of the lead, but the data of the server where your partners' CRMs or lendings (or your own) are located.
This functionality is useful for:
Tracking fraudulent activities: With this data, you can identify attempts to send fake leads, especially those that come through tools like Postman.
Improving lead quality: Understanding the sources of leads can help you manage campaigns and engage with partners more effectively.
The section helps keep your lead handling process safe and secure.

Is Lock: This feature locks status and deposit updates for a specific lead. This is useful in situations where you want to prevent any changes until the information is analyzed or confirmed.
Both features help control the processing of leads and provide stability in managing them.
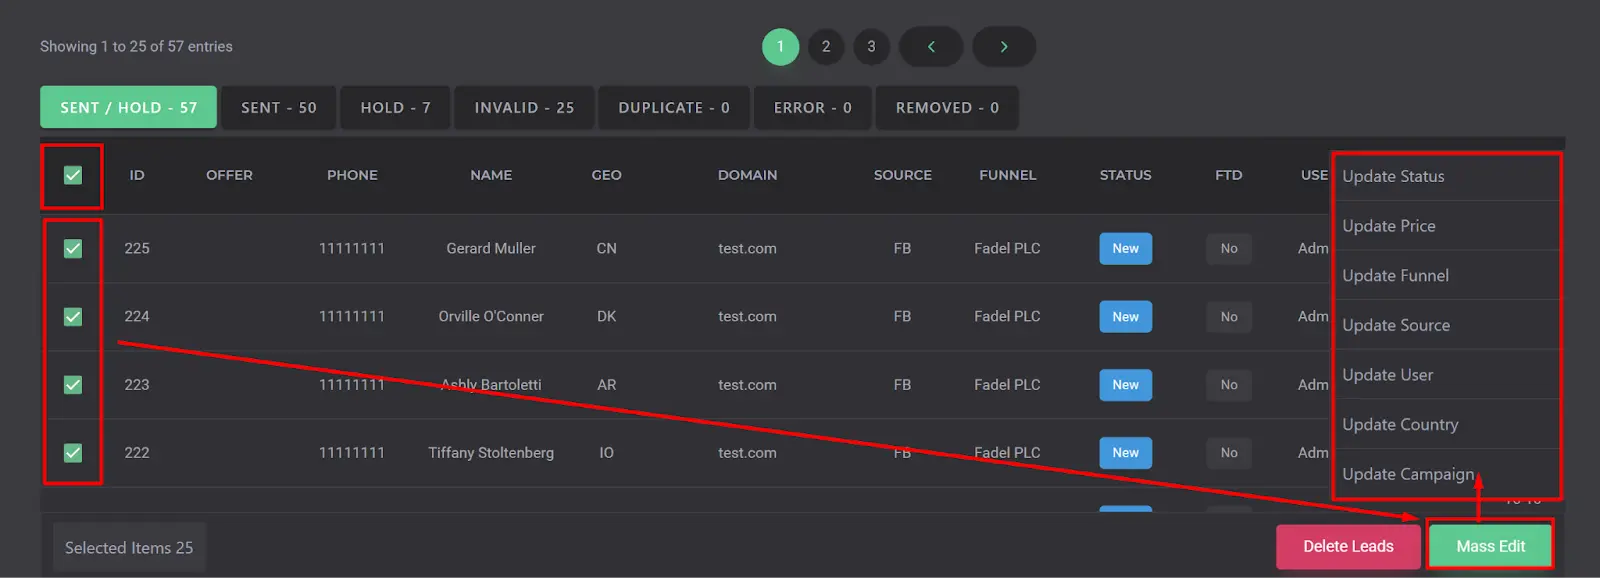
To change parameters on several leads at once, follow these steps:
This feature helps you save time and simplify the process of managing a large number of leads at once.
Inject — is a feature that automatically sends leads from the HOLD section based on specified conditions. It applies to leads that:
To use the Inject feature, follow these steps:
This feature allows you to automate the lead handling process and minimize traffic loss, providing more efficient campaign management.
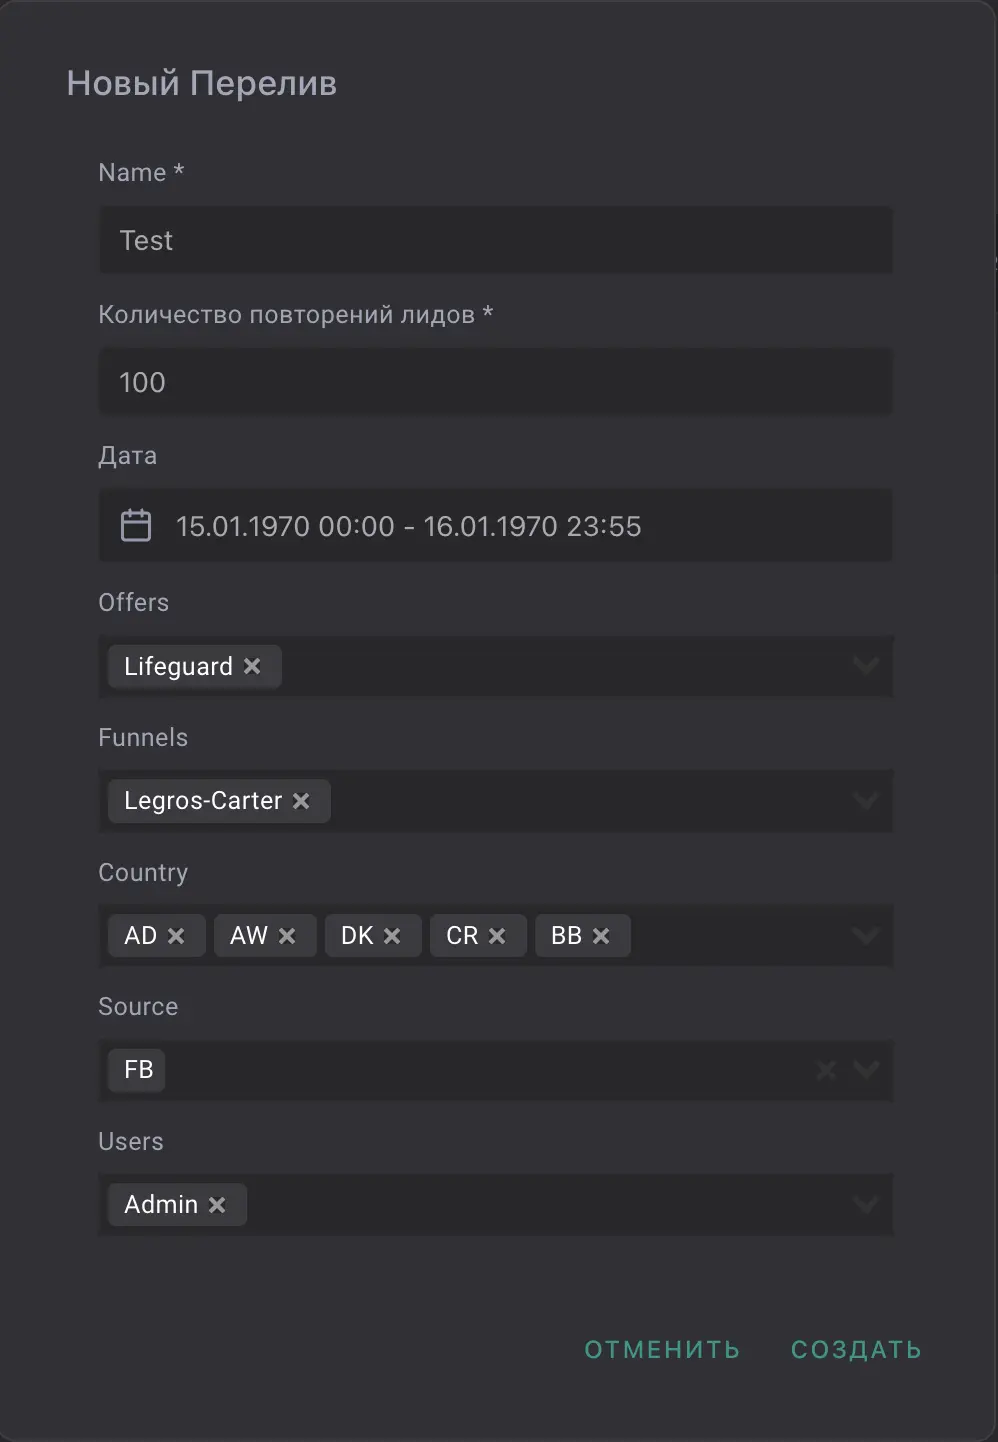
After you have completed the settings:
In the campaign settings, complete the table for sending leads by specifying the required parameters and conditions. This will ensure that leads are automatically processed and sent according to your requirements.
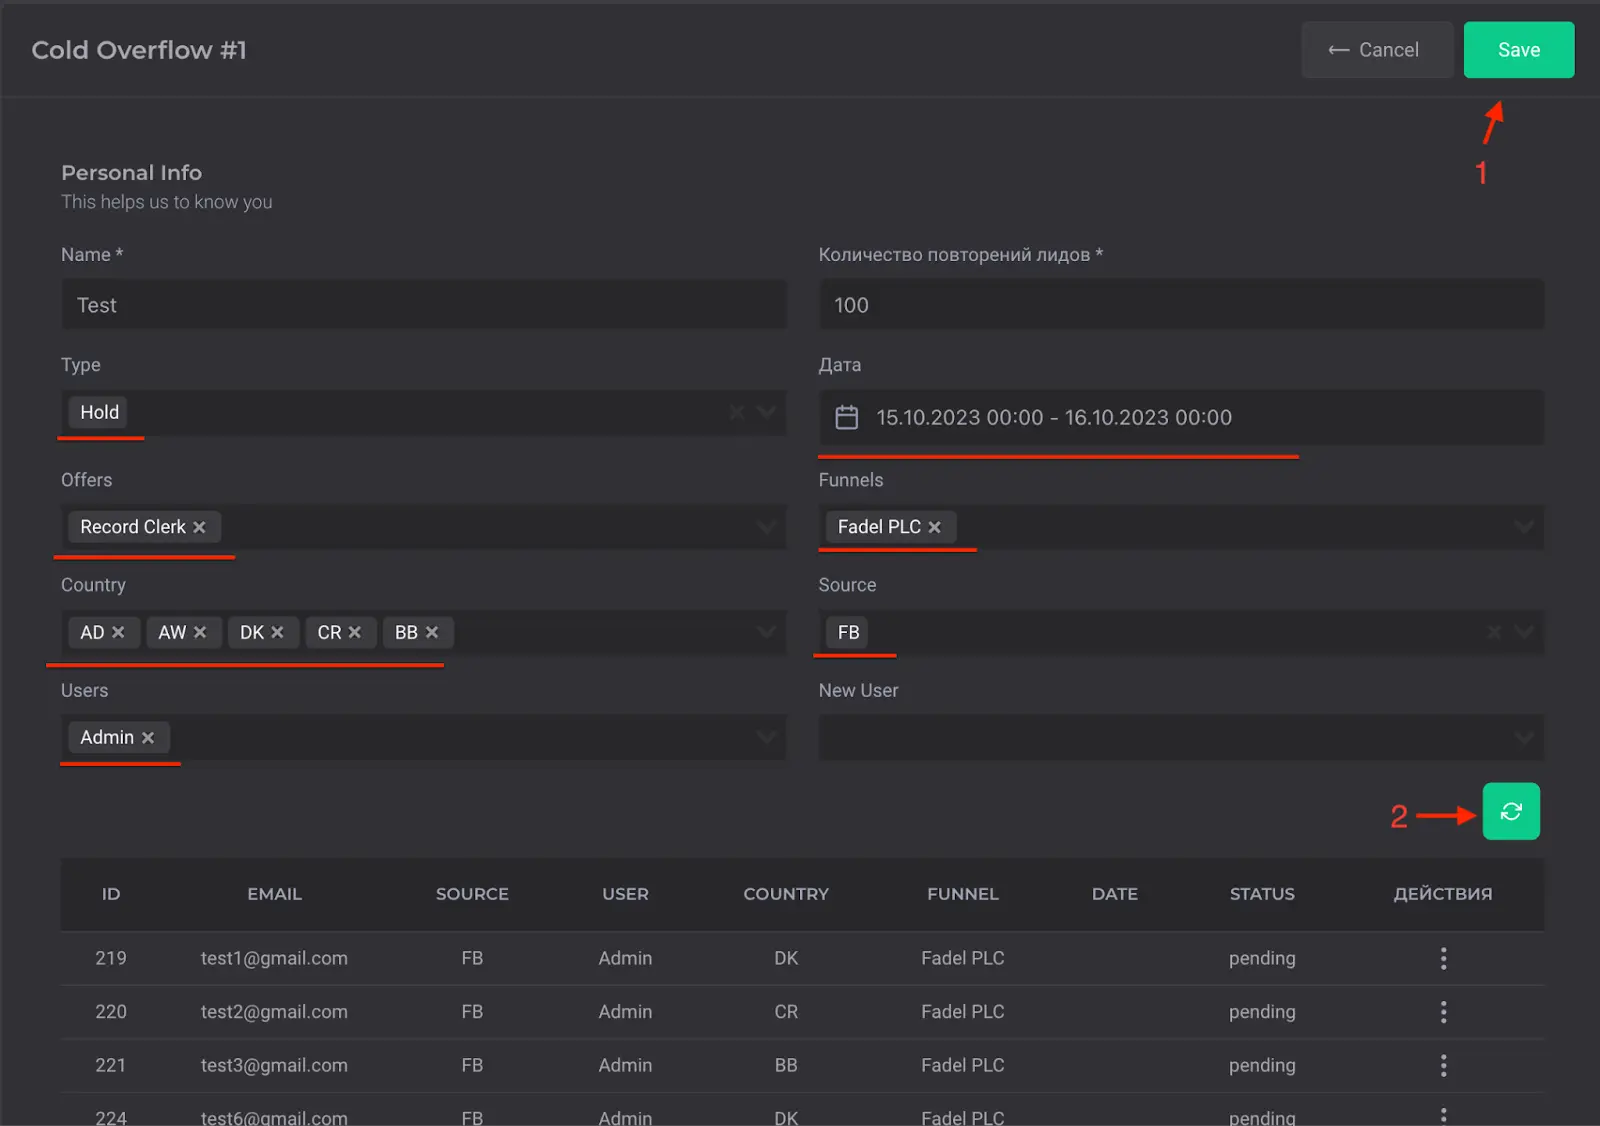
After verifying and filling in all the data:
You should then have the leads ready to send.
This way, you will be able to effectively manage and control the sending of leads.
The CRM system provides various user roles, each with unique access rights. Here is a brief description of each role:
Exporting leads is located in the Leads section.
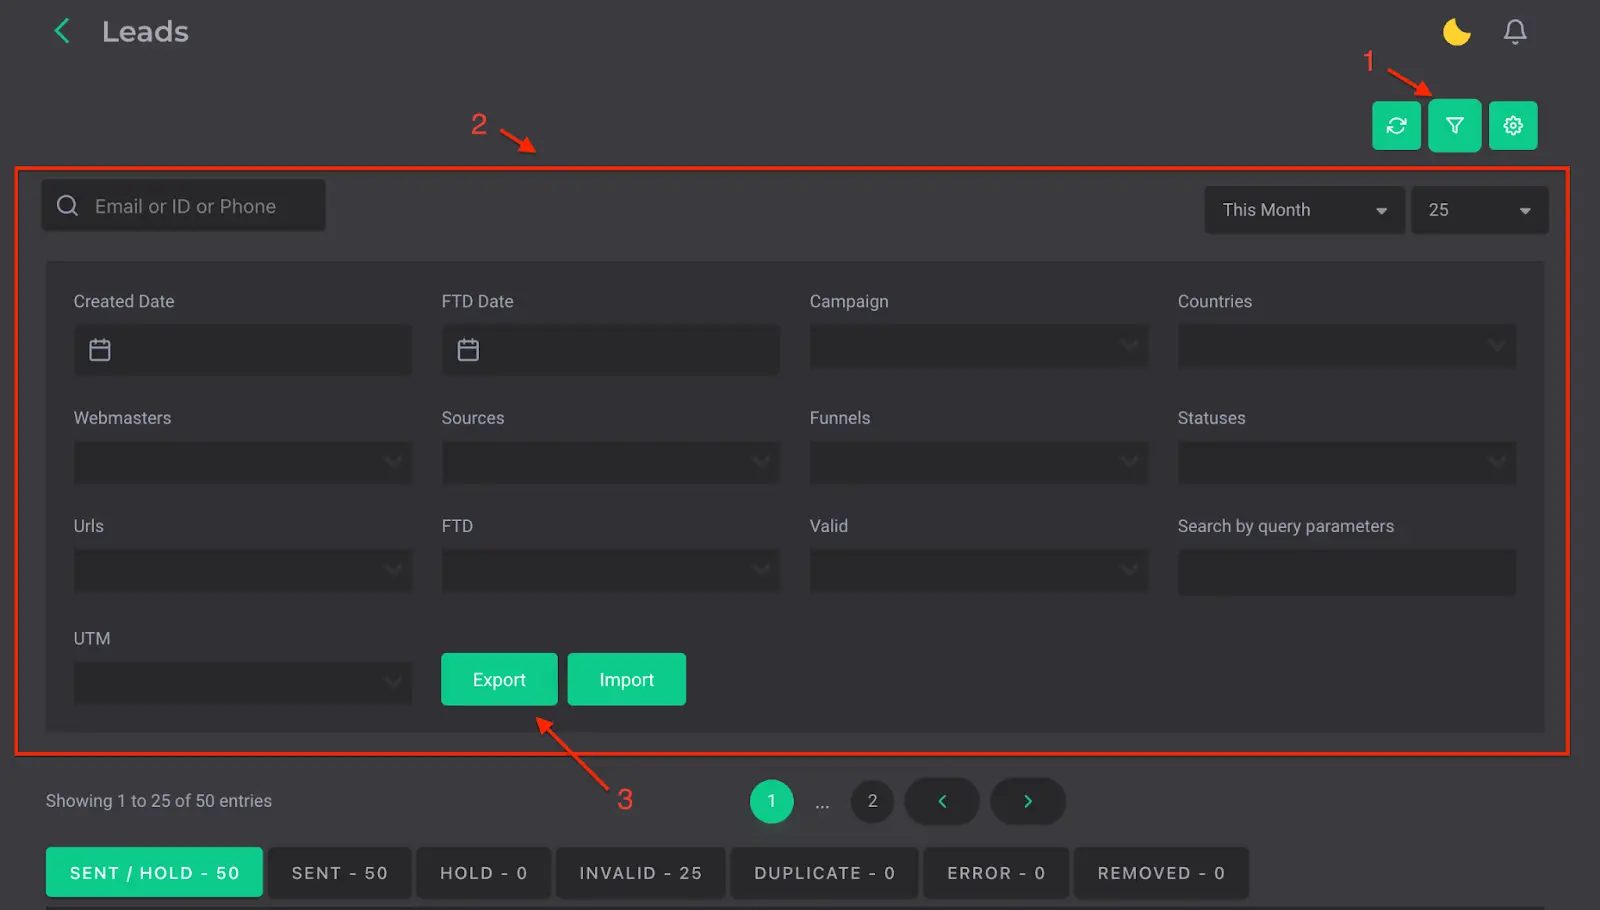
Here's how to export leads from the Leads section to CRM:
Prepare a table for importing leads.
Required fields:
Example:

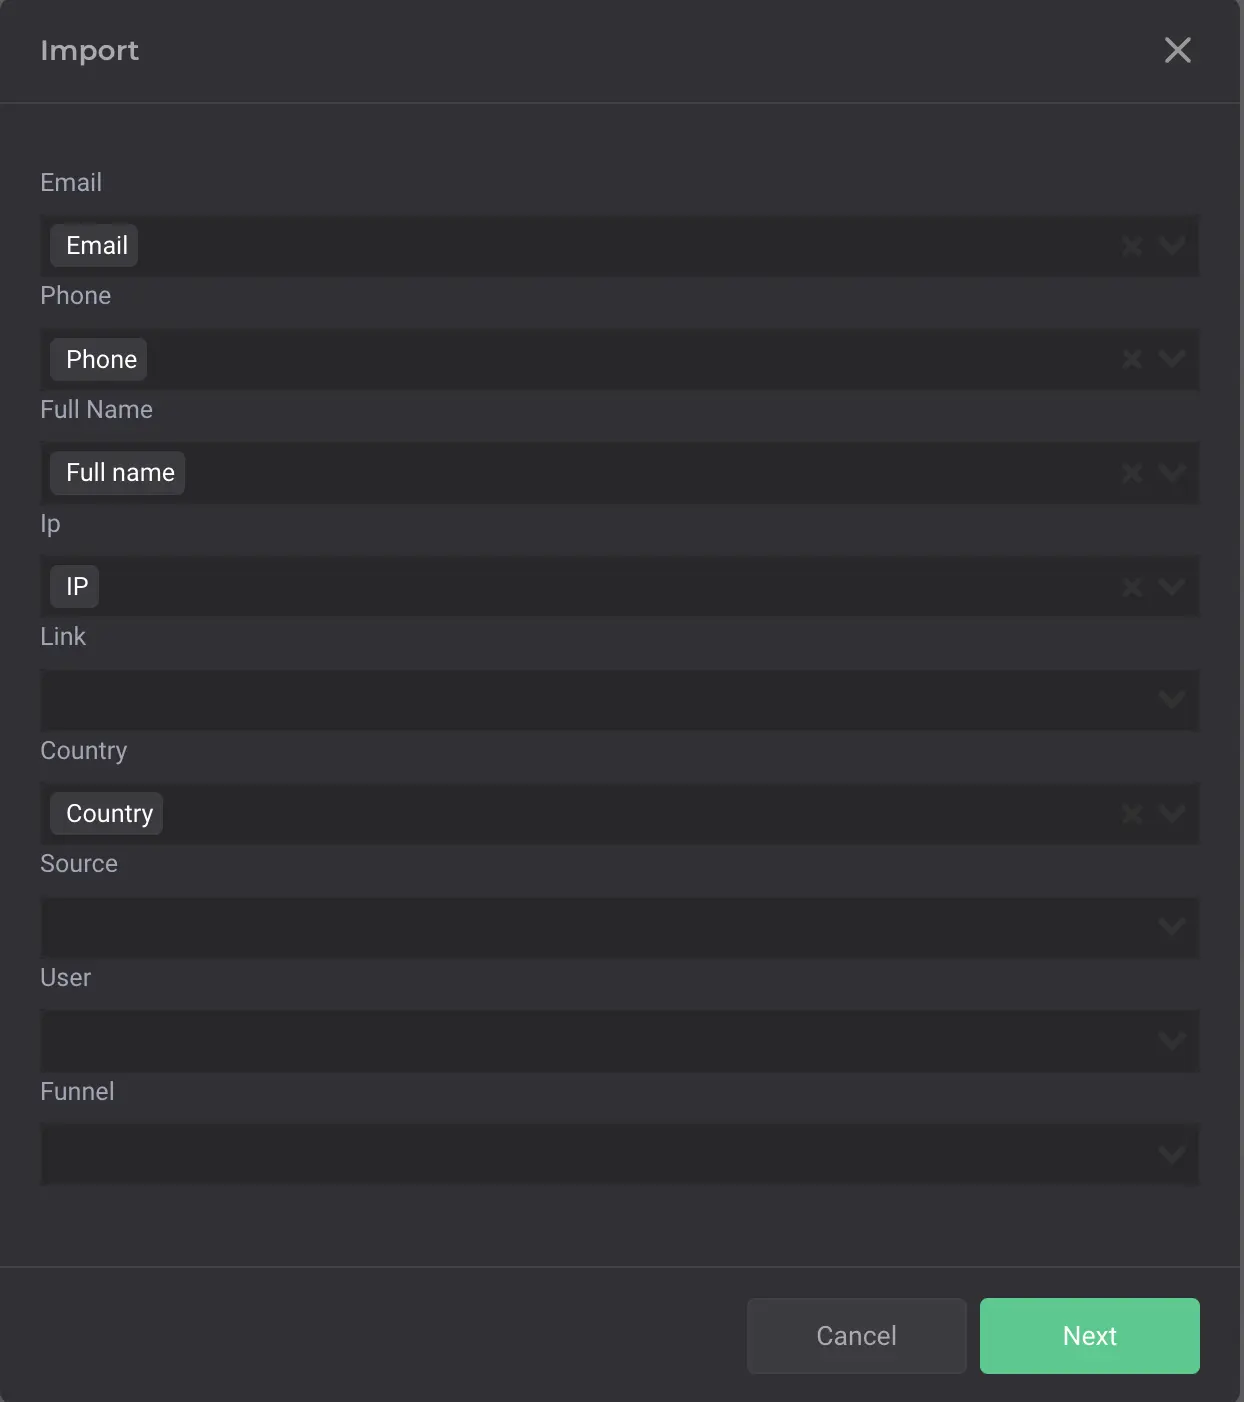
After that, you will be shown the fields that you have not filled in. You can select the missing data from your CRM database to complete the process. This will allow you to complete the information and ensure that the lead is sent or processed correctly.
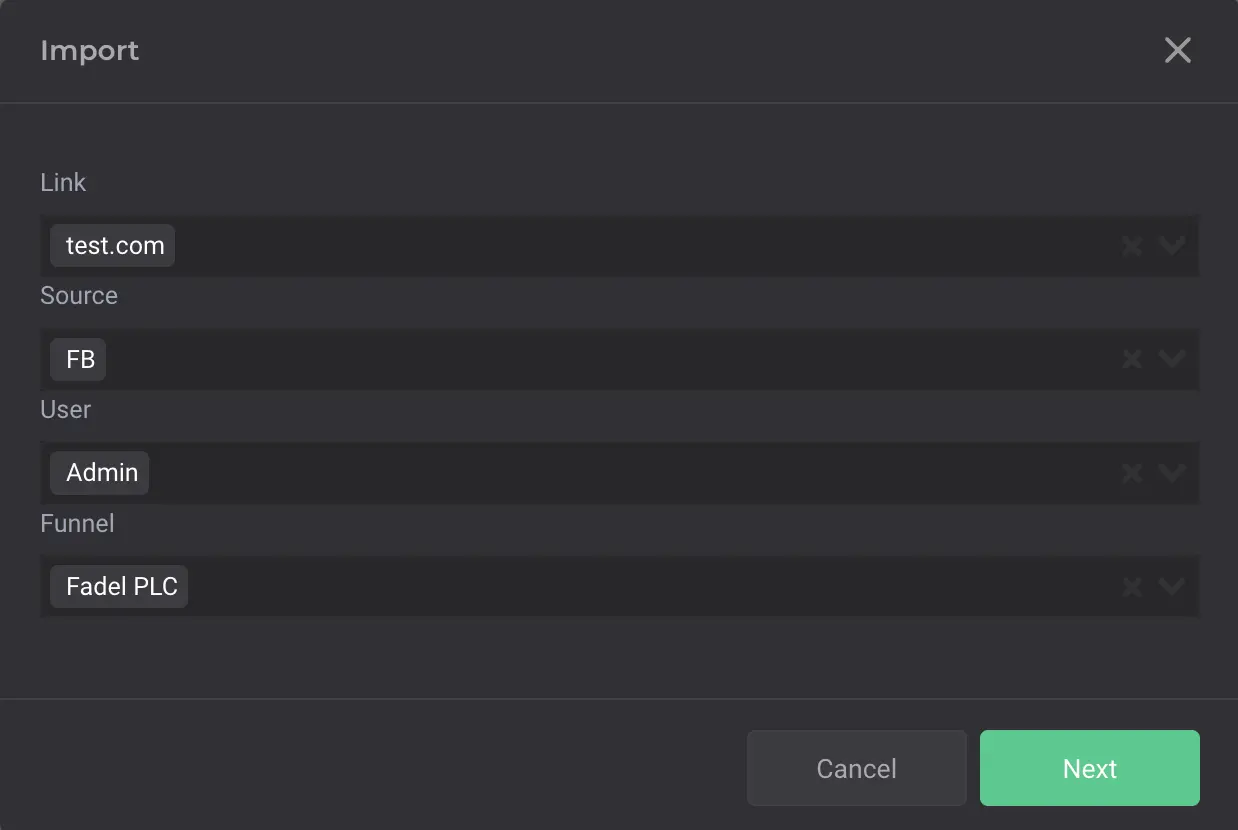
Click Next. If the import is successful, you will see the Success. Imported leads will be moved to the HOLD section. This will allow you to manage them conveniently and track their status.
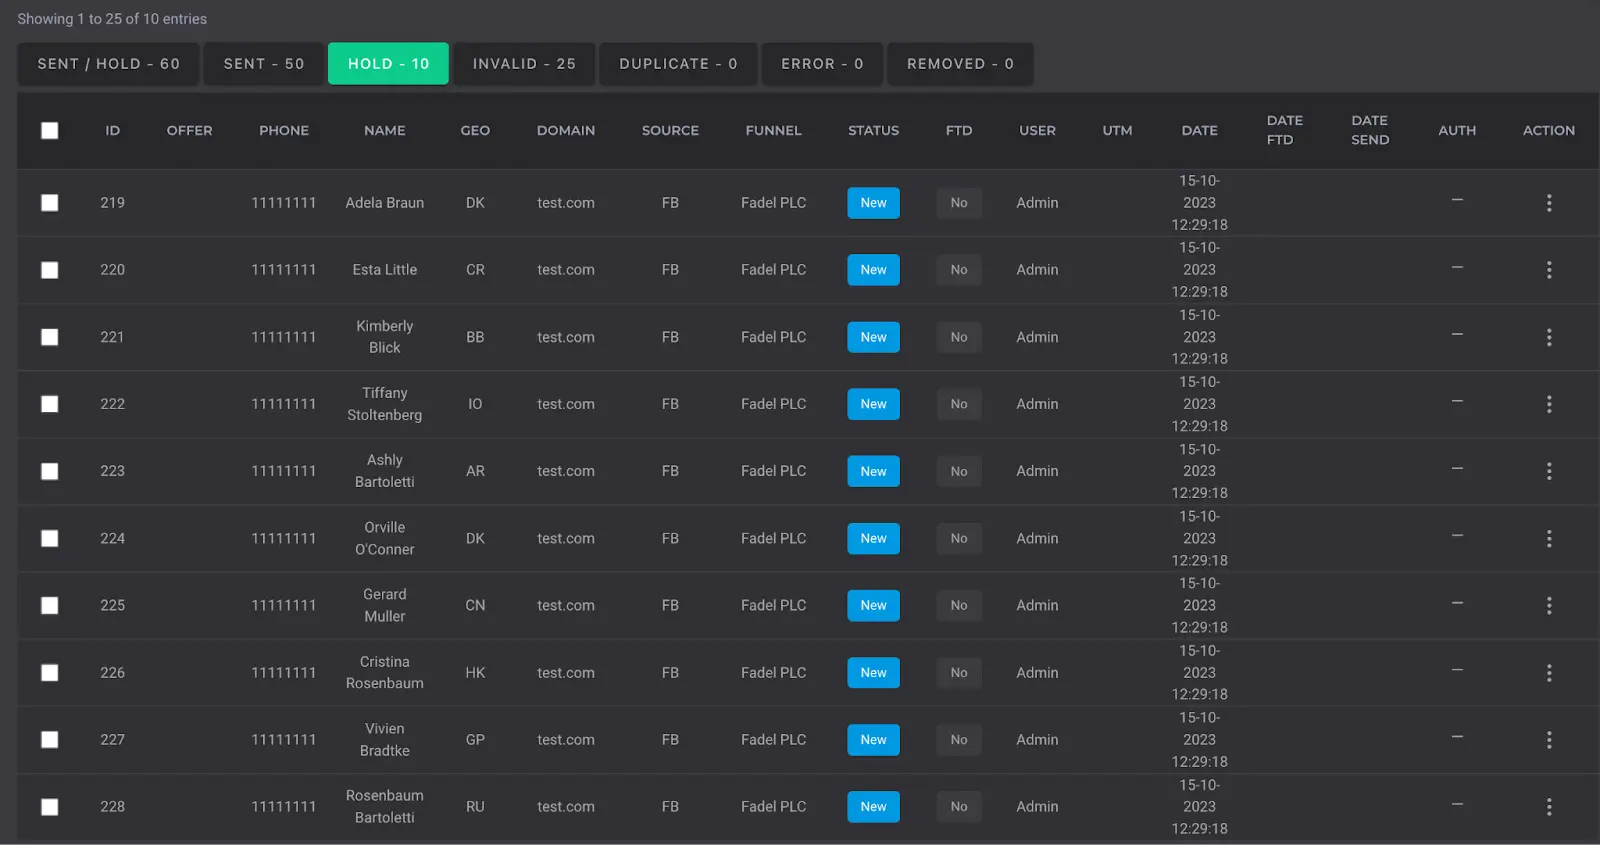
1. View lead information::
2. Analyze the CRM response:
3. Check available campaigns:
Click the "Send" tab and see the available campaigns. If there are no available campaigns:
Go to the "Campaign" section and make sure all three parameters for sending a lead are completed.
If all conditions are met, there are probably two reasons for the problem:
Your campaign reached the set limit and automatically paused.
Your campaign was manually or scheduled to be turned off.
4. Analyze the response from the brand:
If duplicate leads still get to the broker, it is necessary to set up the system correctly. To do this, perform the following steps:
1. Open Settings.
2. Next, open Duplicate Leads.
3. Indicate the checkmark for the following options:
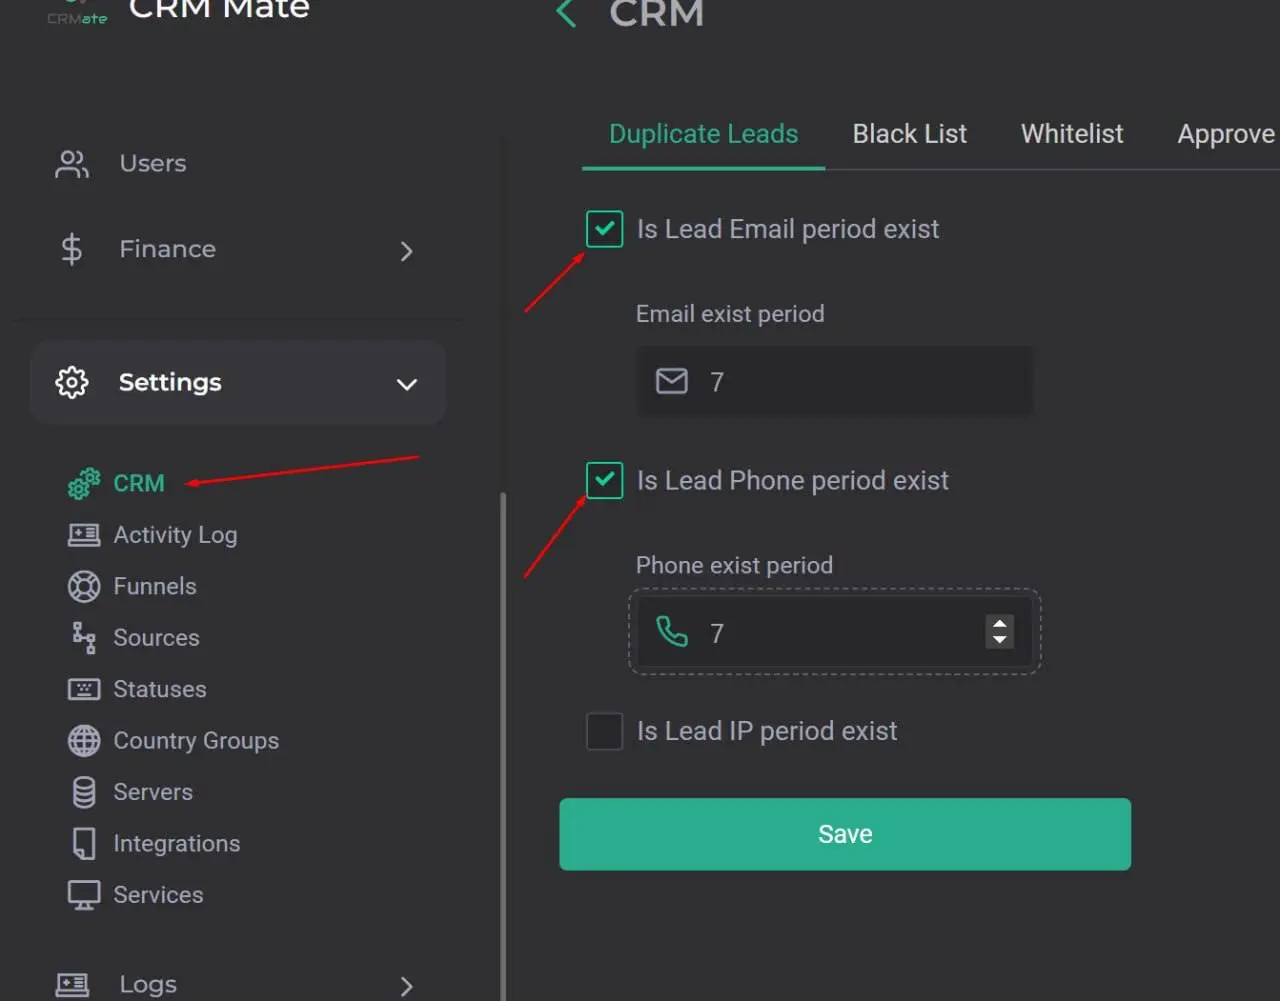
Note that the system accepts lead duplicates in any case, they just go into a separate folder, not sent directly to the broker, so you can conveniently keep track of all your duplicates.
